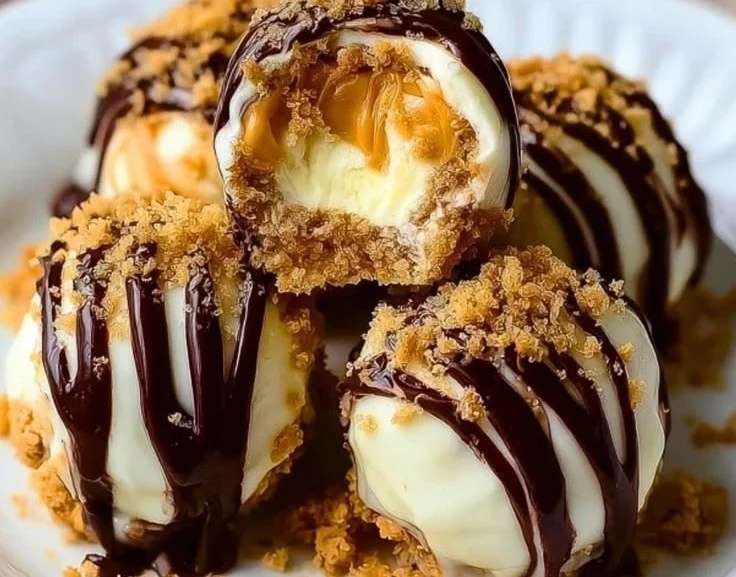
After a long week of juggling work, family, and everything in between, there’s nothing quite like the comfort of a sweet treat that’s as rewarding as it is effortless to make. Picture this: it’s a sunny Saturday afternoon, and you’re enjoying a bit of downtime with the aroma of peanut butter wafting through your kitchen. You grab a mixing bowl, and within short minutes, you create something magical: No-Bake Peanut Butter Cheesecake Balls. Each bite is a delightful rush of creamy peanut butter and smooth chocolate that takes you back to those childhood days of licking the bowl clean. It’s more than just dessert; it’s a little hug in ball form!
Recipe Timing
- Prep Duration: 10 minutes
- Active Cooking: 10 minutes
- Total Duration: 40 minutes (includes chilling time)
- Portion Size: Makes about 20 balls
- Complexity: Simple
Nutritional Recipe
- Calories per portion: 100 kcal
- Protein: 2 grams
- Carbs: 12 grams
- Fats: 5 grams
- Fiber: 0.5 grams
- Sugars: 6 grams
- Sodium: 50 mg
Why You’ll Love This No-Bake Peanut Butter Cheesecake Balls
Let’s be honest: who can resist the combo of peanut butter and chocolate? These No-Bake Peanut Butter Cheesecake Balls bring together the rich creaminess of cream cheese and peanut butter, sweetened just right with powdered sugar and a hint of vanilla. Plus, their no-bake nature means you get to skip the oven entirely while still creating a dessert that feels indulgent. They’re perfect for gatherings, movie nights, or just an afternoon pick-me-up. Once you pop one in your mouth, you’ll find it hard to stop!
The Complete Cooking Journey
Making these little treats is not just about the end result; it’s about the journey! From beating the ingredients together to rolling them into delightful balls and dipping them in silky chocolate, every step is satisfying. And with minimal cleanup, you’ll wonder why you didn’t try these sooner!
Ingredients:
- 1 cup cream cheese, softened
- 1/2 cup peanut butter
- 1/4 cup powdered sugar
- 1 teaspoon vanilla extract
- 1 cup graham cracker crumbs
- 1/2 cup chocolate chips (for coating)
- Optional: chopped nuts or sprinkles for garnish
Method:
Step 1: Combine the Base Ingredients
In a mixing bowl, combine softened cream cheese, peanut butter, powdered sugar, and vanilla extract. Mix until smooth and well combined.
Step 2: Form the Dough
Gradually add the graham cracker crumbs and mix until a dough forms. You want it to be pliable and easy to roll.
Step 3: Roll into Balls
Roll the mixture into small balls, about 1 inch in diameter. Don’t worry about them being perfect; imperfections add character!
Step 4: Melt the Chocolate
Melt the chocolate chips in a microwave-safe bowl in 30-second intervals, stirring after each interval until smooth. Keep an eye on it to avoid burning!
Step 5: Coat the Balls
Dip each ball into the melted chocolate, ensuring it is fully coated for that delicious chocolate shell.
Step 6: Set the Coating
Place the coated balls on a baking sheet lined with parchment paper.
Step 7: Optional Garnishing
Before the chocolate hardens, sprinkle with chopped nuts or colorful sprinkles for that extra flair.
Step 8: Refrigerate to Set
Refrigerate for at least 30 minutes to set before serving. This crucial step enhances the flavors and gives your balls that perfect bite.
Serving Suggestions & Pairings
These peanut butter cheesecake balls are wonderful on their own, but you can elevate your presentation by serving them alongside fresh fruit like strawberries or bananas. A scoop of vanilla ice cream would complement them beautifully too! Perfect for entertaining or movie nights, they are a crowd-pleaser.
Storage & Leftovers Guide
Store any leftovers (if there are any!) in an airtight container in the refrigerator for up to one week. You can also freeze them for up to three months. Just let them thaw in the fridge before enjoying.
Kitchen Wisdom & Success Tips
- Ensure your cream cheese is softened for easy mixing; if it’s cold, you’ll struggle to blend the ingredients well.
- Feel free to mix in flavors! A touch of cinnamon or a pinch of sea salt can add depth.
- If you’re not a fan of chocolate, you can drizzle some melted white chocolate or use yogurt coating instead for a different taste profile.
Flavor Variations & Adaptations
Get creative! Substitute almond or cashew butter for a nut allergy-friendly version. You could also add mini chocolate chips or crushed cookies to the dough for a delicious twist. And if you prefer crunch, consider mixing in some rice cereal as well!
Reader Questions & Solutions
-
Can I use low-fat cream cheese?
Absolutely! Low-fat cream cheese will work, but the texture may be slightly less creamy. -
What can I use instead of graham cracker crumbs?
Ground digestive biscuits or even crushed pretzels can be a great substitute, adding a different flavor profile. -
How do I keep my chocolate from hardening too quickly?
Try warming the chocolate while you work; you can reheat it gently if it starts to harden too soon. -
Can I use natural peanut butter?
Yes, natural peanut butter works, but because it’s less sweet, you may want to add a bit more powdered sugar. -
How long do these last in the freezer?
They’ll last up to three months in the freezer! Just make sure to wrap them well.
Wrapping Up
These No-Bake Peanut Butter Cheesecake Balls are not just a recipe; they’re an experience of joy and satisfaction. Whether you’re treating yourself or sharing with loved ones, the creamy, dreamy goodness these bites deliver is hard to resist. So grab your ingredients, roll up your sleeves, and let the sheer deliciousness whisk you away—it’s time to create!
PrintNo-Bake Peanut Butter Cheesecake Balls

Delightful no-bake treats that combine creamy peanut butter and smooth chocolate, perfect for any gathering or as a sweet afternoon pick-me-up.
- Prep Time: 10 minutes
- Cook Time: 10 minutes
- Total Time: 40 minutes
- Yield: 20 balls 1x
- Category: Dessert
- Method: No-Bake
- Cuisine: American
- Diet: Vegetarian
Ingredients
- 1 cup cream cheese, softened
- 1/2 cup peanut butter
- 1/4 cup powdered sugar
- 1 teaspoon vanilla extract
- 1 cup graham cracker crumbs
- 1/2 cup chocolate chips (for coating)
- Optional: chopped nuts or sprinkles for garnish
Instructions
- Combine the Base Ingredients: In a mixing bowl, combine softened cream cheese, peanut butter, powdered sugar, and vanilla extract. Mix until smooth and well combined.
- Form the Dough: Gradually add the graham cracker crumbs and mix until a dough forms. You want it to be pliable and easy to roll.
- Roll into Balls: Roll the mixture into small balls, about 1 inch in diameter. Don’t worry about them being perfect; imperfections add character!
- Melt the Chocolate: Melt the chocolate chips in a microwave-safe bowl in 30-second intervals, stirring after each interval until smooth. Keep an eye on it to avoid burning!
- Coat the Balls: Dip each ball into the melted chocolate, ensuring it is fully coated for that delicious chocolate shell.
- Set the Coating: Place the coated balls on a baking sheet lined with parchment paper.
- Optional Garnishing: Before the chocolate hardens, sprinkle with chopped nuts or colorful sprinkles for that extra flair.
- Refrigerate to Set: Refrigerate for at least 30 minutes to set before serving. This crucial step enhances the flavors and gives your balls that perfect bite.
Notes
Store leftovers in an airtight container in the refrigerator for up to one week, or freeze for up to three months.
Nutrition
- Serving Size: 1 ball
- Calories: 100
- Sugar: 6g
- Sodium: 50mg
- Fat: 5g
- Saturated Fat: 2g
- Unsaturated Fat: 3g
- Trans Fat: 0g
- Carbohydrates: 12g
- Fiber: 0.5g
- Protein: 2g
- Cholesterol: 15mg