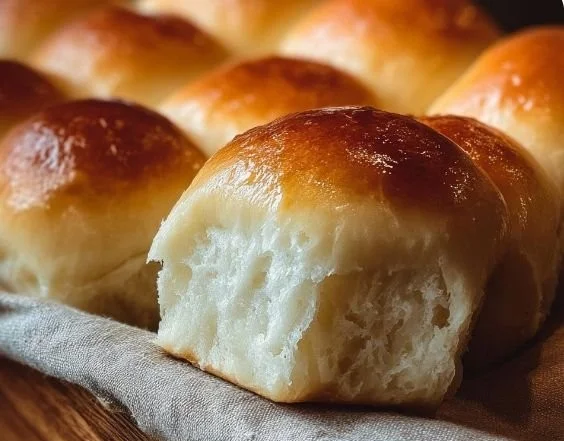
There’s something truly magical about the aroma of freshly baked bread wafting through your home. It transports me back to my grandmother’s cozy kitchen, where the warmth of the oven mingled with her infectious laughter. She had a knack for creating soft, buttery rolls that could turn any ordinary dinner into a feast, and to this day, I cherish the memories of her teaching me the gentle artistry of bread-making. Today, I want to share that joy with you through my recipe for Soft and Buttery Homemade Rolls — a simple yet delightful way to fill your home with warmth and comfort.
Recipe Timing
- Prep Duration: 15 minutes
- Active Cooking: 20 minutes
- Total Duration: 1 hour 15 minutes (including rising time)
- Portion Size: Serves approximately 12 rolls
- Complexity: Simple
Nutritional Recipe
- Calories per portion: ~150 calories
- Protein: 4g per serving
- Carbs: 25g per serving
- Fats: 5g per serving
- Fiber: 1g per serving
- Sugars: 2g per serving
- Sodium: 150mg per serving
Why You’ll Love This Soft and Buttery Homemade Rolls
Imagine the soft pillowy texture of these rolls as they imagine themselves perfectly alongside a warm bowl of soup or a hearty roast. With a delicate sweetness from the sugar and a rich buttery flavor, these rolls are irresistible comfort food that brings smiles to faces young and old. What’s more, they are surprisingly easy to make, allowing even novice bakers to achieve bakery-worthy results right in their own kitchens. Whether for a festive family dinner or simply as a delightful accompaniment to your daily meals, these rolls are sure to impress.
The Complete Cooking Journey
Let’s dive into the wondrous world of baking these glorious rolls. From mixing to baking, we’ll navigate each step together, ensuring that you not only have a successful baking experience but also create a cherished memory in your kitchen.
Ingredients:
- 4 cups all-purpose flour
- 1 packet instant yeast (about 2.25 teaspoons)
- 1/4 cup granulated sugar
- 1 teaspoon salt
- 1 cup warm milk (make sure it’s Halal-certified)
- 1/4 cup unsalted butter (melted)
- 2 large eggs (beaten)
- Additional melted butter (for brushing, optional)
Method:
Step 1: Activate the Yeast
In a large mixing bowl, combine the warm milk and sugar. Sprinkle the instant yeast on top and let it sit for about 5-10 minutes until it becomes frothy. This step is crucial as it ensures your rolls rise beautifully!
Step 2: Mix the Wet Ingredients
Once your yeast mixture is frothy, mix in the melted butter and beaten eggs. Stir until well combined, allowing the butter to meld seamlessly with the other ingredients.
Step 3: Combine Dry Ingredients
In a separate bowl, whisk together the all-purpose flour and salt. This helps distribute the salt evenly, preventing any chunkiness in your rolls.
Step 4: Create the Dough
Gradually add the dry ingredients to the wet mixture, stirring with a wooden spoon or spatula until a soft dough forms. It’s okay if it seems a little sticky; that’s part of the charm! Just be careful not to overmix; you want to keep it tender.
Step 5: Knead the Dough
Turn your dough out onto a lightly floured surface and knead for about 5-7 minutes, until it’s smooth and elastic. This is a bit of an arm workout, but it’s totally worth it — you’ll release your inner baker!
Step 6: First Rise
Place your kneaded dough into a greased bowl, cover it with a clean kitchen towel, and let it rise in a warm area for about 1 hour, or until it has doubled in size. During this time, prepare for the delightful smell that will soon fill your home.
Step 7: Shape the Rolls
Once your dough has risen, punch it down to release the air, then turn it out onto a lightly floured surface. Divide the dough into 12 equal pieces, and shape each piece into a smooth ball. Place them in a greased baking dish or on a baking sheet, leaving some space between each one for rising.
Step 8: Second Rise
Cover the shaped rolls with the kitchen towel again and let them rise for another 30 minutes, or until they puff up nicely. The anticipation builds as you watch them grow!
Step 9: Bake to Perfection
Preheat your oven to 350°F (175°C). Once it’s ready, bake the rolls for about 20 minutes, or until they are golden brown and sound hollow when tapped. The sight and smell will fill your heart as you pull them from the oven.
Step 10: Brushing and Cooling
If desired, brush the tops of the rolls with additional melted butter for that extra touch of indulgence. Let them cool slightly before serving; they’ll be irresistibly warm and soft.
Serving Suggestions & Pairings
These rolls are perfect as a side dish for soups, stews, or roasted meats. Spread a little honey or jam over them for breakfast, or serve them warm alongside your favorite pasta dishes. Create a memorable meal by pairing them with a fresh salad and a flavorful dip — your guests will remember your culinary delight and rave about it long after the meal!
Storage & Leftovers Guide
Store leftover rolls in an airtight container at room temperature for 2-3 days. If you’d like to keep them fresh longer, pop them into the freezer for up to a month. Just thaw them at room temperature and warm them in the oven before serving.
Kitchen Wisdom & Success Tips
- Ensure your milk is warm, not hot, to keep the yeast happy. A temperature between 110°F and 115°F is ideal.
- If you’re short on time, consider using a stand mixer with a dough hook attachment for kneading, making it an extra quick process.
- Experiment with different spreads or toppings; garlic butter or cheese can elevate these rolls into a whole new culinary experience.
Flavor Variations & Adaptations
Feel free to sneak in some herbs or cheese for a twist! Chopped rosemary or shredded cheddar can add that extra flair, perfect for a family gathering or when you’re feeling a little adventurous.
Reader Questions & Solutions
-
Q: My rolls didn’t rise well. What did I do wrong?
A: Make sure your yeast is fresh, and check that your milk wasn’t too hot or cold. Both can hinder the fermentation process! -
Q: Can I make the dough ahead of time?
A: Absolutely! You can prepare the dough and store it in the fridge overnight. Just allow it to come to room temperature before shaping and second rising. -
Q: How can I make these rolls healthier?
A: Swap out half the all-purpose flour for whole wheat flour or add some ground flaxseed for added nutrition and fiber. -
Q: How do I know when my rolls are done baking?
A: They should be a lovely golden brown and have a hollow sound when tapped on the bottom. Use a kitchen thermometer if you’re unsure — they should reach around 190°F (88°C). -
Q: Can I use active dry yeast instead of instant yeast?
A: Yes! Just dissolve it in warm milk first and allow it to sit until frothy before mixing in your other wet ingredients.
Wrapping Up
Making your own Soft and Buttery Homemade Rolls is not just about baking; it’s about creating an experience filled with love, nostalgia, and deliciousness. Every bite will remind you of the joys of home cooking and the warmth it brings to our lives. I encourage you to gather your loved ones in the kitchen, roll up your sleeves, and embark on this delightful journey together. You’re creating not just rolls, but memories that will last a lifetime!
Now, go ahead and let the magic of homemade rolls fill your home with peace and joy. Happy baking!
PrintSoft and Buttery Homemade Rolls
A simple yet delightful recipe for soft and buttery homemade rolls that fill your home with warmth and comfort.
- Prep Time: 15 minutes
- Cook Time: 20 minutes
- Total Time: 75 minutes
- Yield: 12 servings 1x
- Category: Side Dish
- Method: Baking
- Cuisine: Baking
- Diet: Vegetarian
Ingredients
- 4 cups all-purpose flour
- 1 packet instant yeast (about 2.25 teaspoons)
- 1/4 cup granulated sugar
- 1 teaspoon salt
- 1 cup warm milk (Halal-certified)
- 1/4 cup unsalted butter (melted)
- 2 large eggs (beaten)
- Additional melted butter (for brushing, optional)
Instructions
- Activate the yeast: In a large mixing bowl, combine the warm milk and sugar. Sprinkle the instant yeast on top and let it sit for about 5-10 minutes until it becomes frothy.
- Mix the wet ingredients: Once your yeast mixture is frothy, mix in the melted butter and beaten eggs.
- Combine dry ingredients: In a separate bowl, whisk together the all-purpose flour and salt.
- Create the dough: Gradually add the dry ingredients to the wet mixture, stirring until a soft dough forms.
- Knead the dough: Turn your dough out onto a lightly floured surface and knead for about 5-7 minutes, until smooth and elastic.
- First rise: Place your kneaded dough in a greased bowl, cover with a towel, and let it rise for about 1 hour until doubled in size.
- Shape the rolls: Punch down the dough, turn it onto a floured surface, divide into 12 pieces, and shape each into a ball.
- Second rise: Cover the rolls with a towel and let them rise for another 30 minutes.
- Bake to perfection: Preheat your oven to 350°F (175°C) and bake the rolls for about 20 minutes until golden brown.
- Brush and cool: If desired, brush the tops with melted butter and let them cool slightly before serving.
Notes
These rolls are perfect as a side dish for soups, stews, or roasted meats. Store leftovers in an airtight container for 2-3 days or freeze for longer storage.
Nutrition
- Serving Size: 1 roll
- Calories: 150
- Sugar: 2g
- Sodium: 150mg
- Fat: 5g
- Saturated Fat: 3g
- Unsaturated Fat: 2g
- Trans Fat: 0g
- Carbohydrates: 25g
- Fiber: 1g
- Protein: 4g
- Cholesterol: 70mg