
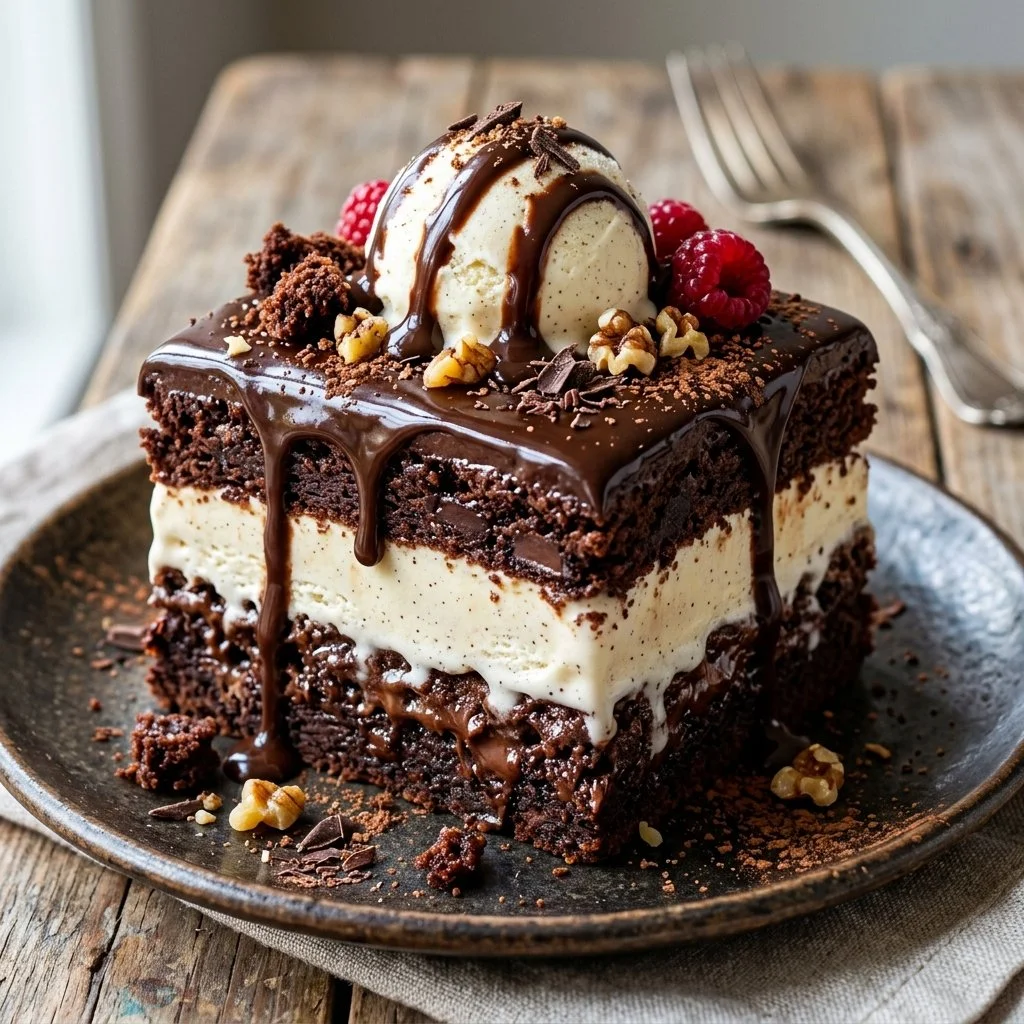
There’s something magical about desserts that combine the beloved flavors of chocolate and ice cream. Every bite beckons childhood memories, spontaneous late-night indulgences, and shared moments with friends and family. One particularly delightful treat that captures all these sentiments is the Brownie Ice Cream Cake. Picture this: a fudgy, rich brownie base crowned with a layer of creamy ice cream, a drizzle of luscious chocolate syrup, and a dollop of whipped cream topped with a cherry! It’s a dessert that not only looks impressive but also sings joy on the palate. Today, I’m excited to share this delightful recipe that is incredibly easy and fun to make!
Recipe Timing
- Prep Duration: 15 minutes
- Active Cooking: 25 minutes (not including freezing time)
- Total Duration: 2 hours 40 minutes
- Portion Size: Serves 8
- Complexity: Simple
Nutritional Recipe
- Calories per portion: Approximately 350
- Protein: 4g
- Carbs: 45g
- Fats: 15g
- Fiber: 2g
- Sugars: 30g
- Sodium: 220mg
Why You’ll Love This Brownie Ice Cream Cake
Whether it’s a weekend gathering, a birthday celebration, or simply a time when you crave something sweet, this Brownie Ice Cream Cake fits the bill perfectly. The combination of rich brownie and cold ice cream is simply irresistible. Plus, it’s extremely versatile—choose your favorite ice cream flavor and watch your guests’ faces light up with delight! It’s the dessert that keeps on giving, combining different textures and experiences in every bite.
The Complete Cooking Journey
Creating this cake isn’t just about baking; it’s a full journey from the kitchen to your table. It starts with the warm, comforting smell of fresh brownies wafting through the house and finishes with the visual joy of serving up sweet, indulgent slices. And I assure you, when you share this treat with your loved ones, you’ll feel a surge of happiness as they savor every decadent mouthful.
Ingredients:
- 1 box brownie mix
- 1/4 cup vegetable oil
- 2 large eggs
- 1 pint ice cream (any flavor)
- 1 cup chocolate syrup
- Whipped cream (for topping)
- Cherries (for garnish)
Method:
Step 1: Preheat the Oven
Preheat the oven according to the brownie mix instructions, creating the optimal environment for those fudgy brownies to come to life.
Step 2: Prepare the Brownie Batter
In a mixing bowl, combine the brownie mix, vegetable oil, and eggs. Stir until smooth and combined, with no lumps lingering—this is the foundation of your cake!
Step 3: Bake the Brownies
Pour the brownie batter into a greased 9-inch round cake pan. Bake according to package instructions, letting the oven work its magic and transform the mixture into a heavenly brownie.
Step 4: Cool the Brownies
Once baked, allow the brownies to cool completely in their pan. Patience is key! You need to ensure the brownies are cool enough to support the ice cream layer without melting it.
Step 5: Layer the Ice Cream
Once cooled, take your pint of ice cream and layer it on top of the brownies. Smooth it out into a nice even layer—this is where the flavors meld together beautifully.
Step 6: Freeze Until Firm
Pop the brownie and ice cream masterpiece into the freezer for at least 2 hours, allowing it to firm up into a solid treat, ready for slicing.
Step 7: Drizzle with Chocolate Syrup
After the ice cream has set, drizzle the chocolate syrup generously on top. Get creative with your design, making it look extravagant and inviting!
Step 8: Garnish and Serve
Finally, add a beautiful swirl of whipped cream and top with cherries. Slice into wedges, serve, and witness the smiles it brings!
Serving Suggestions & Pairings
Pair this heavenly dessert with a hot cup of coffee or a glass of cold milk for a classic combination. You might also consider serving it alongside fresh fruit, such as strawberries or raspberries, to add a refreshing contrast.
Storage & Leftovers Guide
If you’re lucky enough to have leftovers (which isn’t often!), store the Brownie Ice Cream Cake in the freezer for up to one week. Just be sure to cover it well to prevent freezer burn!
Kitchen Wisdom & Success Tips
- Don’t skip cooling: Letting the brownies cool completely is essential for the layers to hold up.
- Ice cream magic: Use slightly softened ice cream for easier spreading but avoid letting it melt too much.
- Experiment with flavors: Don’t be afraid to swap the brownie mix for different flavors or mix-ins like nuts or chocolate chips for extra texture.
Flavor Variations & Adaptations
Feel free to experiment with different ice cream flavors such as mint chocolate chip or cookies and cream. You can also layer sauces like caramel instead of chocolate or throw in a layer of crushed cookies for fun!
Reader Questions & Solutions
-
Can I make this ahead of time? Absolutely! You can prepare it a day or two in advance and keep it in the freezer. Just add the toppings right before serving.
-
What if I don’t have a round cake pan? You can use any shape of pan; just adjust the freezing time a little based on the depth of the cake.
-
Can I use homemade brownie recipes instead of a mix? Sure! Just ensure it’s a recipe that yields a sturdy base for layering.
-
What can I use instead of chocolate syrup? You might try using hot fudge sauce or fruit syrup for a different taste experience.
-
Can I make it gluten-free? Yes, look for gluten-free brownie mixes and ice creams to enjoy a delicious dessert without gluten.
Wrapping Up
This Brownie Ice Cream Cake is not just a dessert; it’s a joyful experience, bringing friends and family together for sweet moments and indulgent bites. With a few simple steps, you can create a spectacular treat that will become a favorite in your home. Remember, cooking is all about expression, so have fun with it, and don’t hold back on the joy it brings to your table. Happy baking!
PrintBrownie Ice Cream Cake
A delightful dessert combining rich brownies and creamy ice cream, finished with chocolate syrup and whipped cream.
- Prep Time: 15 minutes
- Cook Time: 25 minutes
- Total Time: 160 minutes
- Yield: 8 servings 1x
- Category: Dessert
- Method: Baking
- Cuisine: American
- Diet: Vegetarian
Ingredients
- 1 box brownie mix
- 1/4 cup vegetable oil
- 2 large eggs
- 1 pint ice cream (any flavor)
- 1 cup chocolate syrup
- Whipped cream (for topping)
- Cherries (for garnish)
Instructions
- Preheat the oven according to the brownie mix instructions.
- Combine the brownie mix, vegetable oil, and eggs in a mixing bowl. Stir until smooth and combined.
- Pour the brownie batter into a greased 9-inch round cake pan. Bake according to package instructions.
- Cool the brownies completely in their pan.
- Layer the pint of ice cream on top of the cooled brownies.
- Pop the masterpiece into the freezer for at least 120 minutes.
- Drizzle the chocolate syrup generously on top.
- Add whipped cream swirls and top with cherries, then slice and serve.
Notes
Letting the brownies cool completely is essential for the layers to hold up. Use slightly softened ice cream for easier spreading.
Nutrition
- Serving Size: 1 serving
- Calories: 350
- Sugar: 30g
- Sodium: 220mg
- Fat: 15g
- Saturated Fat: 8g
- Unsaturated Fat: 7g
- Trans Fat: 0g
- Carbohydrates: 45g
- Fiber: 2g
- Protein: 4g
- Cholesterol: 40mg