
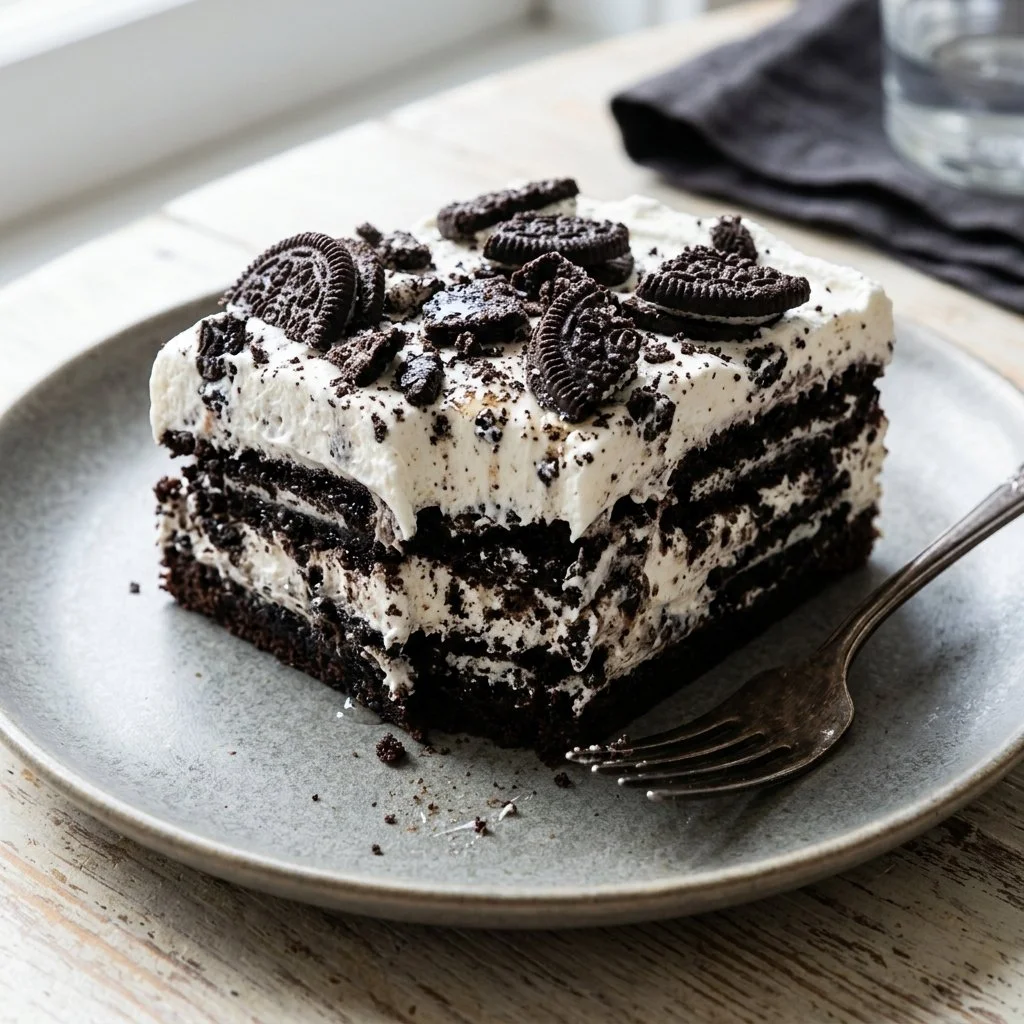
Oreo Icebox Cake has a way of bringing back sweet memories from our childhood. Do you remember those hot summer days when the world seemed to slow down? There was nothing quite like the excitement of dessert! This delightful treat reminds me of picnics in the park, where laughter and chatter filled the air, and the promise of a delicious dessert made everything feel that much sweeter. The combination of creamy whipped topping and the nostalgic crunch of Oreo cookies creates a dessert that is both simple and extraordinary. By layering those beloved cookies and fluffy cream, we craft a dessert that’s much more than just a treat—it’s a joyful celebration of flavors.
Recipe Timing
- Prep Duration: 20 minutes
- Active Cooking: 0 minutes (no baking required)
- Total Duration: 4 hours 20 minutes (includes refrigeration time)
- Portion Size: Serves 8-10
- Complexity: Simple
Nutritional Recipe
- Calories per portion: Approximately 360
- Protein: 2 grams
- Carbs: 46 grams
- Fats: 20 grams
- Fiber: 1 gram
- Sugars: 24 grams
- Sodium: 150 mg
Why You’ll Love This Oreo Icebox Cake
There’s something enchanting about the way the cool, creamy layers meld together, creating the perfect contrast with the crunchy Oreo cookies. Each bite is a nostalgic trip down memory lane, invoking childhood experiences and echoing laughter shared over dessert. Plus, it’s a no-bake wonder, making it the perfect addition to summer gatherings, birthday parties, or even just a quiet evening with family. It’s effortless, delicious, and sure to impress anyone who gets a taste.
The Complete Cooking Journey
The process of making this Oreo Icebox Cake is so straightforward that it feels less like cooking and more like assembling a beautiful collage of delightful flavors and textures. All you need is a few simple steps and a little time in the fridge, and just like that, you have a stunning dessert that will steal the show!
Ingredients:
- 2 packages of Oreo cookies
- 1 cup milk
- 2 cups heavy cream
- 1 cup powdered sugar
- 1 teaspoon vanilla extract
Method:
Step 1: Whip the Creamy Mixture
In a mixing bowl, beat the heavy cream, powdered sugar, and vanilla extract until stiff peaks form. This luscious whipped cream will be the star ingredient, bringing a dreamy lightness to our cake.
Step 2: Dip the Oreo Cookies
Dip the Oreo cookies in milk briefly to soften them just a touch and enhance their chocolatey flavor. Then, layer them in a rectangular dish.
Step 3: Spread the Creamy Layer
Spread a generous layer of the whipped cream mixture over the cookies. This adds a beautiful contrast and creates a silky smooth enticing layer.
Step 4: Create More Layers
Continue alternating layers of cookies and whipped cream until all your ingredients are used up. With each layer, you’ll be building a delightfully fluffy masterpiece.
Step 5: Final Creamy Touch
Finish with a thick layer of whipped cream on top, making it as decadent as your heart desires. You want that creamy finish to stand proud!
Step 6: Chill in the Fridge
Cover the dish and refrigerate for at least 4 hours or overnight. The waiting only makes the flavors even more intense and irresistible!
Step 7: Serve Chilled & Enjoy!
When you’re ready to wow your guests or treat yourself, serve the cake chilled. Slice, serve, and watch the smiles blossom around the table!
Serving Suggestions & Pairings
This Oreo Icebox Cake is delicious on its own, but it can also be paired beautifully with fresh berries, a drizzle of chocolate sauce, or a sprinkle of chocolate shavings on top for that extra wow factor. Scoop a dollop of vanilla ice cream on the side for a rich, indulgent experience!
Storage & Leftovers Guide
If you have any leftovers (which is quite rare!), store the cake covered in the refrigerator. It will stay fresh for up to 3 days, but with the delightful creamy layers, it’s likely to disappear before then!
Kitchen Wisdom & Success Tips
- Make sure to beat your cream until stiff peaks form; this helps create a sturdy structure.
- Allow enough refrigeration time for flavors to meld and the cake to set properly. Overnight is best!
- Experiment with different flavors by adding a touch of espresso powder or using flavored creamers with the heavy cream for whipped layers.
Flavor Variations & Adaptations
Love peanut butter? Swirl in some peanut butter with your whipped cream for a decadent twist. Or try swapping out Oreos for other cookie varieties, like vanilla wafers or even homemade cookies for a unique spin.
Reader Questions & Solutions
-
Q: Can I use low-fat cream instead of heavy cream?
A: While you can, the texture might not be as rich. Heavy cream provides the best results for that luscious whipped layer. -
Q: How do I prevent the Oreos from getting too mushy?
A: Quick dips in milk are key! Don’t let them soak too long—just a brief dip to soften them slightly. -
Q: Can I make this cake a day in advance?
A: Absolutely! In fact, it’s even better when made a day ahead, allowing the flavors to blend beautifully. -
Q: What if I want to add a fruit layer?
A: Great idea! Add a layer of sliced strawberries or bananas between the cookie and cream layers for a fruity addition. -
Q: Can I freeze this cake?
A: Yes! Just ensure it’s tightly wrapped. It can be frozen for up to 2 months, but defrost in the refrigerator before serving.
Wrapping Up
This Oreo Icebox Cake isn’t just a dessert; it’s an experience that stirs nostalgic joy while being incredibly easy to whip up. Your friends and family will delight in each bite, leaving you with smiles and sweet memories. So gather your ingredients, channel your inner child, and create a dessert that will light up everyone’s faces. Happy baking (or should I say assembling) friends!
PrintOreo Icebox Cake

A nostalgic no-bake dessert combining creamy whipped topping and crunchy Oreo cookies, perfect for summer gatherings.
- Prep Time: 20 minutes
- Cook Time: 0 minutes
- Total Time: 260 minutes
- Yield: 8-10 servings 1x
- Category: Dessert
- Method: No-Bake
- Cuisine: American
- Diet: Vegetarian
Ingredients
- 2 packages of Oreo cookies
- 1 cup milk
- 2 cups heavy cream
- 1 cup powdered sugar
- 1 teaspoon vanilla extract
Instructions
- Whip the heavy cream, powdered sugar, and vanilla extract until stiff peaks form.
- Dip the Oreo cookies in milk briefly to soften them.
- Spread a layer of the whipped cream mixture over the cookies.
- Create alternating layers of cookies and whipped cream until all ingredients are used.
- Finish with a thick layer of whipped cream on top.
- Chill in the fridge for at least 4 hours or overnight.
- Serve chilled and enjoy!
Notes
Serve with fresh berries or a drizzle of chocolate sauce for an extra touch!
Nutrition
- Serving Size: 1 serving
- Calories: 360
- Sugar: 24g
- Sodium: 150mg
- Fat: 20g
- Saturated Fat: 12g
- Unsaturated Fat: 8g
- Trans Fat: 0g
- Carbohydrates: 46g
- Fiber: 1g
- Protein: 2g
- Cholesterol: 80mg