There’s something magical about the aroma of freshly baked bread wafting through your kitchen. I still remember the first time I attempted to make pita bread. I was a nervous home cook, standing at my kitchen counter, flour dust swirling around me like a culinary snowstorm. The fear of failure loomed large, but once I pulled those golden, puffed pockets out of the oven, it transformed my kitchen—and my confidence. With each bite, I discovered a simple sweetness and the satisfying chew that is the hallmark of a perfect Greek pita. Today, I want to share that joy with you, so roll up your sleeves and let’s get to this delightful recipe!
Recipe Timing
- Prep Duration: 15 minutes
- Active Cooking: 10 minutes
- Total Duration: 1 hour 25 minutes
- Portion Size: Serves 4
- Complexity: Simple
Nutritional Recipe
- Calories per portion: Approximately 150
- Protein: 4 grams
- Carbs: 30 grams
- Fats: 2.5 grams
- Fiber: 1 gram
- Sugars: 0 grams
- Sodium: 300 mg
Why You’ll Love This Perfect Greek Pita
What makes this perfect Greek pita truly irresistible? It’s the blend of simplicity and authenticity. With just a handful of ingredients, you’re able to create something spectacular. Every bite is soft and chewy, with that wonderful puff that allows you to stuff them with your favorite fillings—whether it’s classic gyro meat, fresh veggies, or a spoonful of tzatziki. Plus, these pitas are versatile; they can serve as a delightful side or a scrumptious vessel for dips and spreads. Your family and friends will be begging for seconds, and you’ll be their hero!
The Complete Cooking Journey
Embarking on this journey to make Perfect Greek Pita is not just about baking; it’s an experience that connects you to ancient culinary traditions. The process invites you to nourish your loved ones while tapping into your inner food artist. From mixing to kneading and finally to baking, you’ll find joy in every moment. So let’s dive into the how-to!
Ingredients:
- 2 cups all-purpose flour
- 1 teaspoon salt
- 1 teaspoon sugar
- 1 tablespoon olive oil
- 1 teaspoon active dry yeast
- 3/4 cup warm water
Method:
Step 1: Mix the Dry Ingredients
In a bowl, mix the flour, salt, and sugar. This initial combination is pivotal as it sets the base for our delicious pitas.
Step 2: Activate the Yeast
Dissolve the yeast in warm water and let it sit for 10 minutes. Watching the yeast foam and bubble is like witnessing magic unfold. This step wakes up the yeast, ensuring your pitas puff up perfectly in the oven!
Step 3: Combine Wet and Dry Mixtures
Add the yeast mixture and olive oil to the flour mixture. Use a spatula to bring the ingredients together, forming a rough dough.
Step 4: Knead the Dough
Knead the dough until smooth, about 10 minutes. It’s your time to shine! Use the palms of your hands to really work that dough; the tactile sensation is a reminder that good food comes from love and effort.
Step 5: Let the Dough Rise
Let the dough rise in a warm place until doubled in size, about 1 hour. This is when the magic happens—you’ll notice the dough growing fluffy and alive.
Step 6: Preheat the Oven
Preheat the oven to 500°F (260°C) with a baking stone or baking sheet inside. The heat is crucial; a hot oven means beautifully puffed pitas!
Step 7: Punch Down and Divide the Dough
Punch down the dough and divide it into balls. You should feel a sense of pride as you see the dough shrink a bit, knowing it has done its job.
Step 8: Create Flat Circles
Roll each ball into a flat circle, roughly 6 inches in diameter. Aim for even thickness—too thick, and they won’t puff; too thin, and they’ll crisp up instead of stay soft.
Step 9: Bake the Pitas
Bake on the preheated stone or sheet until puffed and slightly browned, about 5-7 minutes. This is the moment when your kitchen will fill with the intoxicating smell of fresh bread.
Serving Suggestions & Pairings
Perfect Greek Pita can accompany a myriad of dishes. Serve them with homemade hummus or baba ganoush for an amazing spread, or fill them with grilled vegetables, lamb, or chicken for a hearty meal. Don’t forget a drizzle of olive oil and a sprinkle of fresh herbs!
Storage & Leftovers Guide
Store any leftover pitas in an airtight container at room temperature for up to 2 days. For longer storage, wrap them individually in plastic wrap and freeze for up to 3 months. Just reheat in the oven for a few minutes when you want to enjoy them again.
Kitchen Wisdom & Success Tips
- Use Warm Water: Make sure your water is neither too hot nor too cold—think of a warm bath.
- Check Your Yeast: If it doesn’t foam during activation, it may be dead, so consider getting a fresh batch.
- Don’t Rush the Rise: Patience is key; letting the dough rise properly will yield amazing results.
- Pita Pockets: When baking, allow space between pitas on the baking sheet, so they can puff up beautifully without sticking.
Flavor Variations & Adaptations
Feeling adventurous? Try adding herbs like rosemary or thyme to your flour mixture for a fragrant twist! You can also experiment with whole wheat flour or a gluten-free blend if you want to cater to dietary needs.
Reader Questions & Solutions
- Why did my pita not puff?: It could be due to insufficient heat or the dough not rising enough.
- Can I use whole wheat flour?: Absolutely! Just know it might alter the texture slightly.
- How do I know when the dough has risen enough?: It should double in size and feel airy.
- Can I make mini pitas?: Yes! Simply divide the dough into smaller portions and follow the same steps.
- What should I do if my dough is sticky?: Dust a little flour as you knead until the desired consistency is achieved.
Wrapping Up
Making Perfect Greek Pita is more than just baking—it’s about sharing warmth, hospitality, and love through food. Whether enjoyed with family or friends, these pitas offer a slice of Mediterranean joy that can brighten any day. I encourage you to dive in, experiment, and perhaps share this recipe with someone you love. Happy baking!
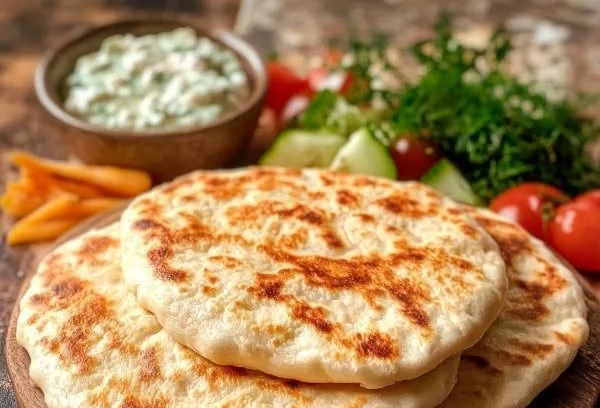
PrintPerfect Greek Pita

Deliciously soft and chewy Greek pitas that puff up beautifully, perfect for stuffing with your favorite fillings.
- Prep Time: 15 minutes
- Cook Time: 10 minutes
- Total Time: 85 minutes
- Yield: 4 servings 1x
- Category: Bread
- Method: Baking
- Cuisine: Greek
- Diet: Vegetarian
Ingredients
- 2 cups all-purpose flour
- 1 teaspoon salt
- 1 teaspoon sugar
- 1 tablespoon olive oil
- 1 teaspoon active dry yeast
- 3/4 cup warm water
Instructions
- Mix the Dry Ingredients: In a bowl, combine the flour, salt, and sugar.
- Activate the Yeast: Dissolve the yeast in warm water and let sit for 10 minutes.
- Combine Wet and Dry Mixtures: Add the yeast mixture and olive oil to the flour mixture.
- Knead the Dough: Knead until smooth, about 10 minutes.
- Let the Dough Rise: Let the dough rise in a warm place until doubled in size, about 1 hour.
- Preheat the Oven: Preheat to 500°F (260°C) with a baking stone or baking sheet inside.
- Punch Down and Divide the Dough: Punch down the dough and divide into balls.
- Create Flat Circles: Roll each ball into a 6-inch flat circle.
- Bake the Pitas: Bake on the preheated stone or sheet until puffed and slightly browned, about 5-7 minutes.
Notes
Store leftover pitas in an airtight container at room temperature for up to 2 days or freeze individually for up to 3 months.
Nutrition
- Serving Size: 1 pita
- Calories: 150
- Sugar: 0g
- Sodium: 300mg
- Fat: 2.5g
- Saturated Fat: 0.5g
- Unsaturated Fat: 2g
- Trans Fat: 0g
- Carbohydrates: 30g
- Fiber: 1g
- Protein: 4g
- Cholesterol: 0mg