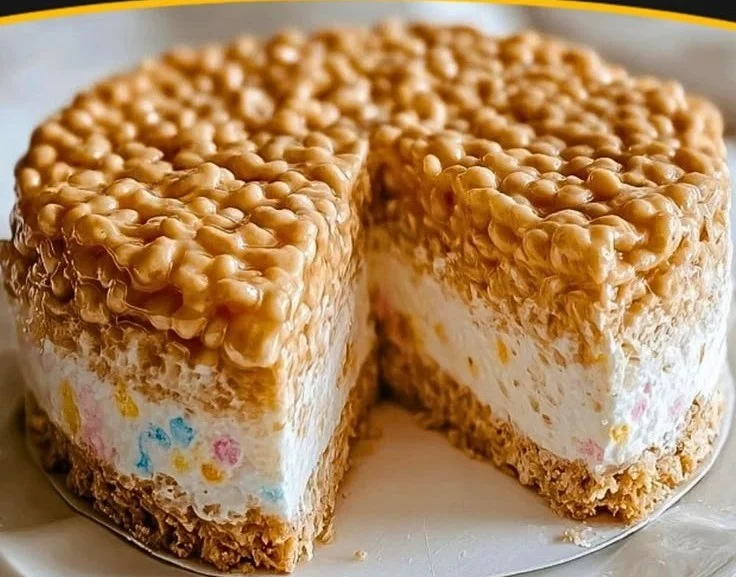
There’s something magical about desserts that combine nostalgia with a touch of decadence. As a child, few things brought me greater joy than a gooey Rice Krispie treat, all marshmallowy and crisp. Fast forward to today, and I’ve found a way to elevate that cherished childhood favorite into a show-stopping dessert: the Rice Krispie Treat Cheesecake. Imagine the satisfying crunch of Rice Krispies mingling with a luscious, creamy cheesecake filling—all encased in one glorious slice. This dessert is an absolute crowd-pleaser, perfect for everything from family gatherings to special celebrations.
## Recipe Timing
- Prep Duration: 20 minutes
- Active Cooking: 15 minutes
- Total Duration: 4 hours 35 minutes (including chilling time)
- Portion Size: Serves 8-10
- Complexity: Simple
## Nutritional Recipe
- Calories per portion: Approximately 360
- Protein: 5g
- Carbs: 43g
- Fats: 20g
- Fiber: 1g
- Sugars: 18g
- Sodium: 180mg
## Why You’ll Love This Rice Krispie Treat Cheesecake
This Rice Krispie Treat Cheesecake is more than just a dessert; it’s a delightful experience. The sweet, crunchy crust provides a perfect contrast to the smooth and rich cheesecake filling. With its playful texture and comforting flavor, it’s a recipe that invites sharing (or not, I won’t judge!). Whether you’re looking to impress guests or simply treat yourself, this cheesecake captures the essence of classic flavors in a fun and innovative way.
## The Complete Cooking Journey
Baking this delightful cheesecake is simple, and watching it come together will certainly bring back sweet memories. So, roll up your sleeves, grab your mixing bowls, and let’s get started on creating this scrumptious Rice Krispie Treat Cheesecake!
## Ingredients:
- 6 cups Rice Krispies cereal
- 1 cup mini marshmallows
- 1 cup unsweetened cream cheese
- 1/2 cup powdered sugar
- 1 cup whipped cream
- 1/2 cup butter
- 1 tsp vanilla extract
## Method:
Step 1: Melt the Butter
In a large bowl, melt the butter over low heat until it becomes a liquid gold that coats your utensils like a warm hug.
Step 2: Combine with Marshmallows
Stir in the mini marshmallows until completely melted, transforming the mixture into a dreamy, sticky concoction that fills your kitchen with sweetness.
Step 3: Mix in the Cereal
Remove from heat and add Rice Krispies cereal; mix until well-coated. You want every little rice puff to bask in that sweet marshmallow embrace!
Step 4: Form the Crust
Press the mixture into the bottom of a springform pan to form the crust. Make sure it’s compact, so it holds together when you slice into it later.
Step 5: Beat the Cream Cheese
In another bowl, beat the cream cheese until smooth, creating a perfect base for our cheesecake filling.
Step 6: Sweeten the Deal
Add the powdered sugar and vanilla, then fold in the whipped cream until combined. This step transforms your mixture into a cloud of creamy, dreamy delight that makes you smile.
Step 7: Pour and Spread
Pour the cheesecake filling over the Rice Krispie crust, spreading it evenly to ensure every slice has that deliciously rich flavor.
Step 8: Chill Out
Chill in the refrigerator for at least 4 hours or until firm. Patience is key; this step allows the flavors to meld beautifully.
Step 9: Slice and Serve
Once firm, slice and serve, enjoying the delightful blend of crunch and creaminess that awaits you. Allow each bite to evoke childhood memories while indulging in a sophisticated dessert.
## Serving Suggestions & Pairings
Serve this delightful cheesecake with fresh berries or a drizzle of chocolate sauce. A dollop of whipped cream on the side or a scoop of vanilla ice cream can elevate the experience even further. It’s the perfect conclusion to a dinner party or just a cozy night in.
## Storage & Leftovers Guide
Store any leftovers (if there are any!) covered in the refrigerator for up to 5 days. The crust will remain crunchy while the filling stays smooth, making it a great treat to enjoy throughout the week.
## Kitchen Wisdom & Success Tips
- Ensure your cream cheese is at room temperature for easier mixing.
- Don’t skip the chilling step; this helps the cheesecake set properly.
- If you want to jazz up the filling, consider adding mini chocolate chips or a swirl of peanut butter.
## Flavor Variations & Adaptations
Feel free to experiment! Add in some crushed Oreo cookies for a cookies-and-cream twist, or swap the vanilla extract for almond extract for a different flavor profile. You could also fold in crushed fruit for a refreshing summertime version.
## Reader Questions & Solutions
-
Q: Can I use a different type of cereal?
A: Absolutely! Use any puffed cereal, like Fruity Pebbles or Cocoa Puffs, for a fun twist. -
Q: What can I use instead of cream cheese?
A: Try mascarpone cheese or a dairy-free alternative if you’re avoiding cream cheese. -
Q: How can I make this gluten-free?
A: Use gluten-free Rice Krispies and check all packaged ingredients to ensure they are gluten-free. -
Q: How do I prevent the crust from being too soft?
A: Make sure you press the crust mixture firmly into the pan and let it chill completely before adding the filling. -
Q: Can I freeze this cheesecake?
A: Yes! Wrap slices tightly in plastic wrap and store in an airtight container for up to 2 months.
## Wrapping Up
This Rice Krispie Treat Cheesecake is not just a recipe, it’s a journey back to the simple pleasures of childhood—crunchy, sweet, and utterly satisfying. Whether you’re sharing it with loved ones or keeping it all to yourself, I hope it brings joy and deliciousness to your kitchen. Happy baking!
PrintRice Krispie Treat Cheesecake
A delightful dessert combining the nostalgic appeal of Rice Krispie treats with a creamy cheesecake filling, perfect for sharing.
- Prep Time: 20 minutes
- Cook Time: 15 minutes
- Total Time: 275 minutes
- Yield: 8-10 servings 1x
- Category: Dessert
- Method: Baking
- Cuisine: American
- Diet: Vegetarian
Ingredients
- 6 cups Rice Krispies cereal
- 1 cup mini marshmallows
- 1 cup unsweetened cream cheese
- 1/2 cup powdered sugar
- 1 cup whipped cream
- 1/2 cup butter
- 1 tsp vanilla extract
Instructions
- Melt the butter over low heat until it becomes liquid.
- Stir in the mini marshmallows until completely melted.
- Remove from heat and add Rice Krispies cereal; mix until well-coated.
- Press the mixture into the bottom of a springform pan to form the crust.
- Beat the cream cheese until smooth.
- Add the powdered sugar and vanilla, then fold in the whipped cream until combined.
- Pour the cheesecake filling over the Rice Krispie crust, spreading it evenly.
- Chill in the refrigerator for at least 4 hours or until firm.
- Slice and serve, enjoying the delightful blend of crunch and creaminess.
Notes
Ensure cream cheese is at room temperature for easier mixing. Do not skip the chilling step for proper setting.
Nutrition
- Serving Size: 1 slice
- Calories: 360
- Sugar: 18g
- Sodium: 180mg
- Fat: 20g
- Saturated Fat: 10g
- Unsaturated Fat: 8g
- Trans Fat: 0g
- Carbohydrates: 43g
- Fiber: 1g
- Protein: 5g
- Cholesterol: 30mg