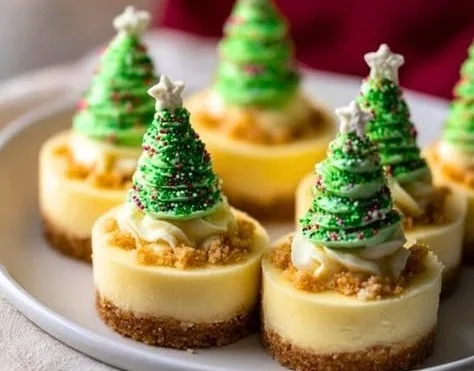
As I sifted through an array of holiday recipes, I stumbled upon a delightful idea that perfectly combines my love for cheesecakes with the festive spirit of Christmas. Imagine tiny, edible Christmas trees gracing your dessert table, bringing joy to both the young and the young at heart. These Christmas Mini Tree Cheesecakes are not just a treat for the taste buds; they’re a vibrant visual celebration of the season too. They remind me of evenings spent with family, crafting decorations while gingerbread aromas drifted through the air. Every bite of these creamy cheesecakes takes me back to those warm, happy times, and I know they’ll do the same for you!
Recipe Timing
- Prep Duration: 30 minutes
- Active Cooking: 15 minutes
- Total Duration: 2 hours 30 minutes (including freezing time)
- Portion Size: Makes about 12 mini cheesecakes
- Complexity: Simple
Nutritional Recipe
- Calories per portion: Approximately 170
- Protein: 2 grams per serving
- Carbs: 18 grams per serving
- Fats: 10 grams per serving
- Fiber: 0 grams per serving
- Sugars: 8 grams per serving
- Sodium: 235 mg per serving
Why You’ll Love This Christmas Mini Tree Cheesecakes
These delightful cheesecakes are not only visually stunning but also incredibly delicious. The creamy texture combined with the sweet crunch of the cookie crust makes each bite a little celebration. Decorated with festive toppings, they are sure to be a hit at any holiday gathering. Plus, the simplicity of making them allows you to focus on enjoying the festivities rather than stressing in the kitchen. Whether for a family gathering or a cookie swap, these mini beauties will spread Christmas cheer to everyone who takes a bite!
The Complete Cooking Journey
Let’s walk through this fun and festive cooking adventure together, turning simple ingredients into an impressive holiday dessert. It’s a little journey filled with creativity and of course, the spirit of Christmas. Keep your mini tree cookie cutters handy, because we’re about to create some magic!
Ingredients:
- 8 oz cream cheese, softened
- 1/2 cup sugar
- 1 tsp vanilla extract
- 1 cup whipped cream
- 1 cup crushed cookies (e.g., graham crackers or Oreo)
- 1/4 cup melted butter
- Green food coloring
- Mini tree cookie cutters
- Decorative toppings (e.g., sprinkles, chocolate stars)
Method:
Step 1: Preheat the Oven and Prepare Muffin Tin
Preheat the oven to 350°F (175°C). Line a muffin tin with cupcake liners to prepare for your mini cheesecakes.
Step 2: Create the Cookie Crust
In a bowl, mix crushed cookies with melted butter until well combined. Press this mixture firmly into the bottom of each cupcake liner to form a sturdy crust.
Step 3: Beat Together the Cheesecake Base
In another bowl, beat together the softened cream cheese, sugar, and vanilla extract until smooth and creamy. This mixture will become the luscious filling for your cheesecakes.
Step 4: Fold in the Whipped Cream and Color It Green
Gently fold in the whipped cream into the cream cheese mixture. Add a few drops of green food coloring and mix until you achieve your desired shade of festive green!
Step 5: Fill the Cups with Cheesecake Mixture
Spoon the cheesecake mixture into each prepared cup, smoothing the tops with a spatula for a neat finish.
Step 6: Freeze the Cheesecakes
Place the muffin tin in the freezer and let the cheesecakes set for at least 2 hours, or until they are firm to the touch.
Step 7: Shape the Cheesecakes into Mini Trees
Once they are set, carefully use the mini tree cookie cutters to cut out tree shapes from each cheesecake. This is the part where the magic happens!
Step 8: Decorate and Serve Your Festive Treats
Finally, decorate your mini cheesecakes with festive toppings like sprinkles, chocolate stars, or anything that sparks joy. Serve them up and watch the smiles unfold!
Serving Suggestions & Pairings
Serve these delightful mini cheesecakes as part of your holiday dessert spread alongside spiced eggnog, hot chocolate, or holiday-themed cocktails. They also make wonderful gifts—just package them in festive containers with a personalized touch!
Storage & Leftovers Guide
Store any leftover mini cheesecakes in an airtight container in the freezer for up to 2 weeks. Just let them thaw for a few minutes before serving, and they will be as delicious as when you first made them!
Kitchen Wisdom & Success Tips
- Room Temperature: Ensure your cream cheese is softened (let it sit at room temperature for about an hour) to avoid lumps in your filling.
- Coloring: Start with a few drops of food coloring; you can always add more for a deeper green once mixed.
- Toppings: Get creative with toppings! Consider using edible glitter or crushed candies for extra sparkle.
Flavor Variations & Adaptations
Feel free to switch up the base by using flavored cream cheese, like strawberry or even pumpkin spice, for a fun twist. You can also change up the cookie crust; use chocolate wafers for a rich Oreo-like flavor!
Reader Questions & Solutions
-
Can I use low-fat cream cheese?
- Absolutely! Low-fat cream cheese can be a great alternative, just keep in mind it may alter the creaminess slightly.
-
What if I don’t have mini tree cutters?
- No problem! Use any cookie cutter you have or simply serve in the muffin liners for a more rustic look.
-
How can I make these non-dairy?
- Substitute cream cheese with a non-dairy alternative and use coconut cream for the whipped cream.
-
What other cookie crusts can I use?
- Experiment with crushed shortbread or even pretzel crumbs for a sweet and salty crust!
-
How long will these last in the fridge?
- They can be kept in the fridge for up to 3 days, but they’re best enjoyed fresh or frozen!
Wrapping Up
These Christmas Mini Tree Cheesecakes are a joyful addition to any holiday celebration. With their delicious flavors, festive presentation, and ease of preparation, they will surely become a beloved staple at your holiday festivities. So gather your loved ones, roll up your sleeves, and dive into this delightful baking adventure! Happy Holidays and happy baking!
PrintChristmas Mini Tree Cheesecakes

These delightful mini cheesecakes shaped like Christmas trees are a festive treat that combines creamy sweetness with a crunchy cookie crust.
- Prep Time: 30 minutes
- Cook Time: 15 minutes
- Total Time: 150 minutes
- Yield: 12 servings 1x
- Category: Dessert
- Method: Baking
- Cuisine: American
- Diet: Vegetarian
Ingredients
- 8 oz cream cheese, softened
- 1/2 cup sugar
- 1 tsp vanilla extract
- 1 cup whipped cream
- 1 cup crushed cookies (e.g., graham crackers or Oreo)
- 1/4 cup melted butter
- Green food coloring
- Mini tree cookie cutters
- Decorative toppings (e.g., sprinkles, chocolate stars)
Instructions
- Preheat the oven to 350°F (175°C). Line a muffin tin with cupcake liners to prepare for your mini cheesecakes.
- Mix crushed cookies with melted butter until well combined. Press this mixture firmly into the bottom of each cupcake liner to form a sturdy crust.
- Beat together the softened cream cheese, sugar, and vanilla extract until smooth and creamy.
- Fold in the whipped cream into the cream cheese mixture. Add a few drops of green food coloring and mix until you achieve your desired shade of festive green!
- Spoon the cheesecake mixture into each prepared cup, smoothing the tops with a spatula for a neat finish.
- Place the muffin tin in the freezer and let the cheesecakes set for at least 2 hours, or until they are firm to the touch.
- Carefully use the mini tree cookie cutters to cut out tree shapes from each cheesecake.
- Decorate your mini cheesecakes with festive toppings like sprinkles, chocolate stars, or anything that sparks joy.
Notes
Store any leftover mini cheesecakes in an airtight container in the freezer for up to 2 weeks. Let them thaw for a few minutes before serving.
Nutrition
- Serving Size: 1 serving
- Calories: 170
- Sugar: 8g
- Sodium: 235mg
- Fat: 10g
- Saturated Fat: 5g
- Unsaturated Fat: 5g
- Trans Fat: 0g
- Carbohydrates: 18g
- Fiber: 0g
- Protein: 2g
- Cholesterol: 30mg