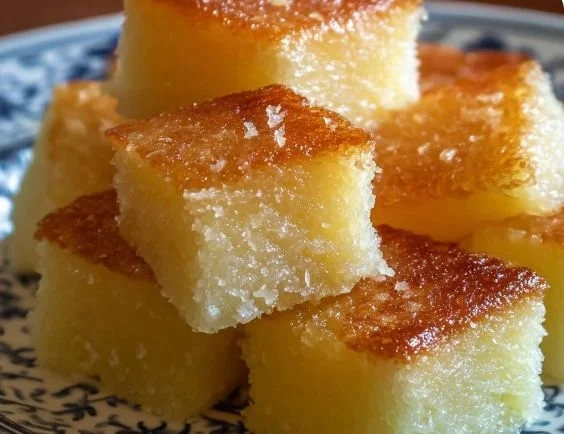
There’s something magical about the first bite of Hawaiian butter mochi. With its soft, chewy texture and delightful hints of sweetness, it transports me back to sun-kissed beaches and the vibrant spirit of the islands. I remember the first time I tasted this treat at a local Hawaiian festival, and it was love at first bite. Something about the combination of coconut and the unique chewiness of sweet rice flour stirred a warmth in my heart that has lasted through the years. Now, every time I make this recipe, it feels like I’m inviting a slice of Hawaii into my kitchen, a true blend of comfort and joy.
Recipe Timing
- Prep Duration: 15 minutes
- Active Cooking: 40 minutes
- Total Duration: 55 minutes
- Portion Size: 12 servings
- Complexity: Simple
Nutritional Recipe
- Calories per portion: 220 calories
- Protein: 3g per serving
- Carbs: 34g per serving
- Fats: 9g per serving
- Fiber: 1g per serving
- Sugars: 12g per serving
- Sodium: 190mg per serving
Why You’ll Love This Hawaiian Butter Mochi
What makes Hawaiian butter mochi such a favorite goes beyond its unbelievable texture. It’s incredibly easy to make and requires just a handful of ingredients, each of which brings something special to the table. The combination of sweet rice flour gives it that sought-after chewiness, while the coconut milk introduces a tropical flair that instantly brightens your day. Not to mention, it’s perfect for sharing at gatherings, serving as a delightful dessert or snack any time of day. Each square you cut is a mini celebration of flavor, a reminder that simple can be extraordinary.
The Complete Cooking Journey
As you embark on this delightful cooking adventure, you’ll experience the transformation of basic ingredients into something truly special. This journey starts with the gentle whisking of eggs and sugar, waiting for the rich aroma of melted butter and vanilla to swirl into the mix. Each step, whether it’s blending in the coconut milk or pouring the batter into a warm, greased pan, feels like a cherished memory in the making.
Ingredients:
- 2 cups sweet rice flour (mochi flour) (Essential for achieving the chewy texture.)
- 1 cup granulated sugar
- 1 tablespoon baking powder
- 1 can coconut milk (13.5 oz)
- ½ cup unsalted butter, melted (Can be substituted with non-dairy butter.)
- 4 large eggs
- 1 teaspoon vanilla extract
- 1 cup milk (Add gradually until desired consistency.)
Method:
Step 1: Prepping Your Tools
Begin by preheating your oven to 350°F (175°C). Grease a 9×13 inch baking dish to ensure your mochi comes out effortlessly.
Step 2: Mixing the Dry Ingredients
In a large mixing bowl, whisk together your sweet rice flour, granulated sugar, and baking powder. This step lays the groundwork, ensuring all ingredients are evenly distributed.
Step 3: Blending the Wet Ingredients
In another bowl, mix the melted butter, coconut milk, eggs, and vanilla extract. Whisk until well combined, allowing the flavors to meld beautifully.
Step 4: Combining the Mixtures
Gradually pour the wet mixture into the bowl with your dry ingredients. Stir gently. You want to create a smooth batter, so feel free to add milk gradually until you reach your desired consistency.
Step 5: Baking to Perfection
Pour the mochi batter into your prepared baking dish and place it in the oven. Bake for 30-35 minutes. You’ll know it’s done when the top is lightly golden and a toothpick inserted comes out clean.
Step 6: Cooling and Cutting
Allow the mochi to cool in the pan for about 15 minutes before transferring it to a wire rack. Once cooled completely, cut into squares and lift them carefully to serve.
Serving Suggestions & Pairings
Hawaiian butter mochi is undeniably delicious on its own. However, you can elevate the experience by dusting it with powdered sugar or serving it with a scoop of coconut ice cream for an indulgent treat. Pair it with a warm cup of coffee or sweet, fruity tea, and you’ll find a delightful harmony.
Storage & Leftovers Guide
Store leftover mochi in an airtight container at room temperature for up to three days. If you wish to keep it longer, refrigerate it for up to a week or freeze it for up to three months. Just be sure to let it come to room temperature before enjoying again for the best texture!
Kitchen Wisdom & Success Tips
- Perfect Texture: The key to that chewy texture lies in the sweet rice flour. Don’t try to substitute it with regular all-purpose flour; it won’t yield the same results.
- Don’t Rush the Cooling: Patience is a virtue! Allowing your mochi to cool helps it set properly and enhances the flavors.
- Variations: Play with flavors! Add some shredded coconut or chocolate chips for a twist.
Flavor Variations & Adaptations
If you’re feeling adventurous, consider adding some fruit purees like mango or passionfruit for an extra burst of flavor. You can also adapt the recipe with dairy-free alternatives to suit dietary needs without sacrificing taste.
Reader Questions & Solutions
-
What can I use instead of sweet rice flour?
Unfortunately, there’s no direct substitute for sweet rice flour, but you might experiment with glutinous rice flour for similar chewiness. -
Can I make this ahead of time?
Yes! You can prepare the batter a day in advance; just store it covered in the fridge and bake it fresh the next day. -
Is this dessert gluten-free?
Absolutely! As long as you use sweet rice flour, this recipe is naturally gluten-free. -
What if I don’t have coconut milk?
You can swap it out for almond milk or even regular milk, but you’ll miss out on that tropical flavor. -
Can I add toppings?
Yes! Adding toasted coconut or fresh fruit on top will add a delightful contrast of texture and flavor.
Wrapping Up
As you bring this Hawaiian butter mochi to life in your kitchen, remember that every whisk, pour, and bake carries with it the essence of Aloha. Embrace the journey and savor the memories created along the way. Gather your loved ones and share this delightful treat that’s brimming with love, because in the end, that’s what cooking is truly all about! Enjoy your trip to Hawaii, bite by bite!
PrintHawaiian Butter Mochi
A delightful dessert that combines the chewiness of sweet rice flour with the tropical flavor of coconut milk.
- Prep Time: 15 minutes
- Cook Time: 40 minutes
- Total Time: 55 minutes
- Yield: 12 servings 1x
- Category: Dessert
- Method: Baking
- Cuisine: Hawaiian
- Diet: Gluten-Free
Ingredients
- 2 cups sweet rice flour (mochi flour)
- 1 cup granulated sugar
- 1 tablespoon baking powder
- 1 can coconut milk (13.5 oz)
- ½ cup unsalted butter, melted
- 4 large eggs
- 1 teaspoon vanilla extract
- 1 cup milk (add gradually until desired consistency)
Instructions
- Preheat your oven to 350°F (175°C) and grease a 9×13 inch baking dish.
- Whisk together the sweet rice flour, granulated sugar, and baking powder in a large mixing bowl.
- Mix the melted butter, coconut milk, eggs, and vanilla extract in another bowl until well combined.
- Pour the wet mixture into the dry ingredients and stir gently. Add milk gradually until reaching desired consistency.
- Pour the mochi batter into the prepared baking dish and bake for 30-35 minutes.
- Cool in the pan for about 15 minutes before transferring to a wire rack. Cut into squares to serve.
Notes
For an extra treat, dust with powdered sugar or serve with coconut ice cream.
Nutrition
- Serving Size: 1 serving
- Calories: 220
- Sugar: 12g
- Sodium: 190mg
- Fat: 9g
- Saturated Fat: 5g
- Unsaturated Fat: 4g
- Trans Fat: 0g
- Carbohydrates: 34g
- Fiber: 1g
- Protein: 3g
- Cholesterol: 50mg