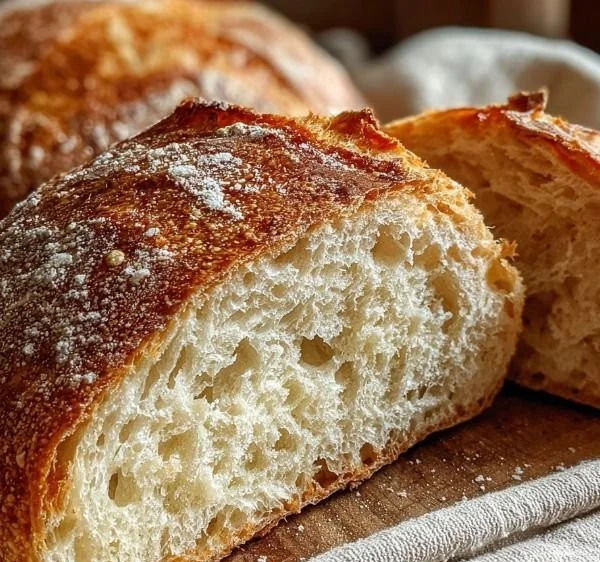
There’s something undeniably magical about the smell of freshly baked bread wafting through the house. It evokes memories of family gatherings, cozy afternoons, and the promise of a warm slice slathered with butter. I still remember the first time I baked bread. It was a chilly autumn afternoon, and the mix of flour and water in my hands felt like pure alchemy. Today, I want to share with you a recipe that brings that joy back: Rustic Artisan Bread with a Crunchy Crust and Airy Center. This bread is not just food; it’s a labor of love that transforms simple ingredients into something extraordinary.
## Recipe Timing
- Prep Duration: 12 to 18 hours (mostly passive)
- Active Cooking: 45 minutes
- Total Duration: Approximately 13 to 19 hours
- Portion Size: Serves about 8
- Complexity: Simple
## Nutritional Recipe
- Calories per portion: 140 kcal
- Protein: 4 grams
- Carbs: 28 grams
- Fats: 0.5 grams
- Fiber: 1 gram
- Sugars: 0 grams
- Sodium: 300 mg
## Why You’ll Love This Rustic Artisan Bread with Crunchy Crust and Airy Center
This Rustic Artisan Bread is the epitome of comfort food. The crust is beautifully crisp, giving way to a light and airy interior that makes every bite a delight. Whether you enjoy it fresh from the oven or toasted the next day, this bread promises to elevate any meal. Plus, the long resting period allows the flavors to deepen, making it taste like it came straight from a bakery. It’s a project that fills your kitchen with warmth and your heart with joy—truly the best way to create a homemade masterpiece.
## The Complete Cooking Journey
Baking bread might seem intimidating at first, but this recipe simplifies the process so anyone can achieve delicious results. You’ll start with the dry ingredients, then watch the magic happen as the dough rises and transforms over time. The best part? There’s minimal hands-on time, allowing you to carry on with your day while your bread develops flavor. I promise, it’s worth it!
## Ingredients:
- 3 cups all-purpose flour
- 1 ½ teaspoons sea salt
- 1 teaspoon instant yeast
- 1 ½ cups lukewarm water (about 100°F)
- Additional flour for dusting
- Cornmeal or flour for the baking surface
## Method:
### Step 1: Combine the Dry Ingredients
In a large mixing bowl, combine the all-purpose flour, sea salt, and instant yeast. Stir gently with a wooden spoon or spatula to ensure an even mix.
### Step 2: Form the Shaggy Dough
Pour the lukewarm water into the dry ingredients. Using your hands or a wooden spoon, stir until a shaggy dough forms. Make sure all the flour is incorporated; don’t worry about smoothness at this stage.
### Step 3: Allow for the Long Rest
Cover the bowl with plastic wrap or a damp cloth and let it rest at room temperature for 12 to 18 hours. This extended resting time is essential for developing flavor and texture.
### Step 4: Shape the Dough
After the resting period, generously flour your work surface. Pour the dough onto the floured surface. With floured hands, gently fold the dough over on itself a few times to shape it into a rough ball. Be careful not to deflate the airy structure that’s developed.
### Step 5: Second Rise
Place the dough seam-side down on a well-floured kitchen towel and cover it with another towel. Let it rest for about 1 to 2 hours or until it has doubled in size.
### Step 6: Preheat Your Oven
About 30 minutes before baking, preheat your oven to 450°F (232°C). Place a Dutch oven or heavy pot with a lid in the oven as it preheats. This creates steam during baking, achieving that coveted crunchy crust.
### Step 7: Prepare to Bake
Once the oven is ready, carefully remove the pot and take off the lid. Sprinkle a little cornmeal or flour onto the bottom of the pot to prevent sticking.
### Step 8: Score the Dough
Turn the risen dough out onto your floured work surface again. Using a sharp knife or a bread lame, make a few shallow cuts on the top of the dough. This allows steam to escape and gives it that rustic look.
### Step 9: Bake the Bread
Gently lift the dough and place it into the hot pot. Replace the lid and return the pot to the oven. Bake the bread covered for 30 minutes, then remove the lid and bake for an additional 15 to 20 minutes, until the crust is deep golden brown and the bread sounds hollow when tapped on the bottom.
### Step 10: Cooling Phase
Once baked, carefully transfer the bread to a wire rack. Allow it to cool completely before slicing. This step is crucial—you want the interior to finish its set while the crust maintains its crunch.
## Serving Suggestions & Pairings
This bread is incredibly versatile. Serve it warm with butter, alongside soups, or as the base for a hearty sandwich. You can also slice it thin to make croutons or serve it with a cheese platter. The sky is the limit!
## Storage & Leftovers Guide
To keep your bread fresh, store it in a paper bag at room temperature for up to three days. You can also slice the bread and freeze it for up to three months; just pop slices straight into the toaster for a quick warm-up!
## Kitchen Wisdom & Success Tips
- Make sure your water is lukewarm—too hot can kill the yeast, and too cold can slow it down.
- Don’t rush the rising time; it’s vital for flavor.
- If you don’t have a Dutch oven, any heavy pot with a lid will work, or you can use a baking stone with steam racks.
## Flavor Variations & Adaptations
Feel free to experiment! Add herbs like rosemary or thyme for a fragrant twist, or throw in some cheese for a savory delight. You can even incorporate whole grains or seeds to amp up the nutrition!
## Reader Questions & Solutions
-
Question: Why is my bread dense?
Solution: Ensure that the dough is allowed to rise sufficiently. Under-proofing is a common culprit for dense bread. -
Question: Can I use a bread machine?
Solution: This recipe is designed for hand-baking, but feel free to experiment with your bread machine’s dough setting. Just follow the manufacturer’s instructions. -
Question: How can I tell if the dough has risen enough?
Solution: It should roughly double in size and feel airy. You can poke it gently; if it springs back slowly, it’s ready. -
Question: Why does my crust not come out crunchy?
Solution: A hot pot is essential! Make sure your oven is fully preheated, and keep the lid on during the first half of baking. -
Question: Can I use whole wheat flour instead?
Solution: Absolutely! Just keep in mind it may require adjustments in liquid and rising times.
## Wrapping Up
Baking Rustic Artisan Bread can feel like a daunting task, but hopefully, this guide will inspire you to roll up your sleeves and give it a try. With just a few simple ingredients and a bit of patience, you’ll create a loaf that not only looks impressive but also tastes like love. So, embrace the process, enjoy the aromas, and savor each bite! Happy baking!