The first snowfall of the year always brings an exhilarating mix of nostalgia and warmth. As the chill bites at my cheeks, I find myself retreating to the cozy corners of my kitchen, where the scent of chocolate and vanilla dances in the air. It’s during this season of snuggling up with loved ones and celebrating the simple joys in life that I crave my favorite winter treat: Hot Chocolate Cheesecake.
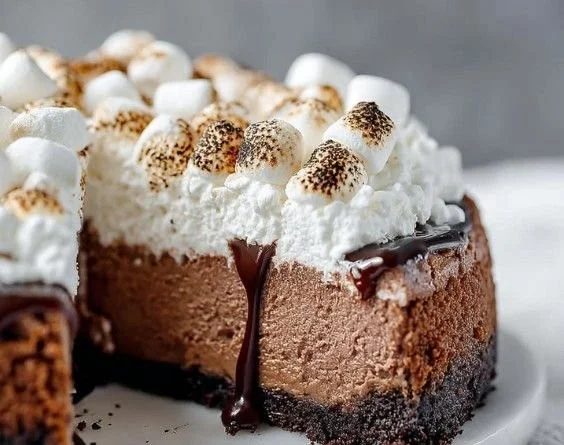
This delightful dessert combines the lusciousness of cheesecake with the comforting flavors of hot chocolate, making it the perfect indulgence for cold nights. Each bite offers a creamy texture topped with fresh whipped cream, mini marshmallows, and a delectable drizzle of warm chocolate sauce—a sweet reminder of childhood nights spent by the fire.
Recipe Timing
- Prep Duration: 30 minutes
- Active Cooking: 60 minutes
- Total Duration: 6 hours (including refrigeration)
- Portion Size: Serves 10-12
- Complexity: Moderate
Nutritional Recipe
- Calories per portion: Approximately 400
- Protein: 7 grams
- Carbs: 30 grams
- Fats: 30 grams
- Fiber: 1 gram
- Sugars: 22 grams
- Sodium: 300 mg
Why You’ll Love This Hot Chocolate Cheesecake
Imagine gathering around the dining table, the warmth of laughter surrounding you, as you slice into this magnificent cheesecake. The graham cracker crust provides a perfect crunch, cradling a velvety filling that’s both rich and indulgent. Each bite brings a subtle hint of cocoa, reminiscent of your favorite holiday hot chocolate, effortlessly transporting you to a cozy winter retreat. Not only is this dessert a show-stopper, but it’s also an experience—a creation that invites conversation and celebration over shared memories.
The Complete Cooking Journey
Let’s roll up our sleeves and embark on this easy yet satisfying journey to create a dessert that will garner smiles from everyone at the table.
Ingredients:
- 1 and 1/2 cups graham cracker crumbs
- 1/4 cup sugar
- 1/2 cup unsalted butter, melted
- 4 (8-ounce) packages cream cheese, softened
- 1 cup granulated sugar
- 1 teaspoon vanilla extract
- 4 large eggs
- 1 cup sour cream
- 1/2 cup cocoa powder
- 1 cup semi-sweet chocolate chips
- Whipped cream for topping
- Mini marshmallows for topping
- Chocolate sauce for drizzling
Method:
Step 1: Preheat the Oven
Preheat the oven to 325°F (160°C) to create the ideal baking environment for your cheesecake.
Step 2: Prepare the Crust
In a mixing bowl, combine graham cracker crumbs, sugar, and melted butter. Mix well and firmly press this mixture into the bottom of a springform pan to form a solid crust.
Step 3: Beat the Cream Cheese
In a separate bowl, beat the softened cream cheese until it’s smooth and creamy. Then, add granulated sugar and vanilla extract, mixing until well combined.
Step 4: Add the Eggs
Add the eggs one at a time, blending well after each addition. This allows for a smoother texture—perfect for cheesecake!
Step 5: Mix in the Sour Cream & Cocoa
Stir in the sour cream, cocoa powder, and melted chocolate chips. Give it a gentle fold until the mixture is rich and luscious before pouring the batter over the prepared crust.
Step 6: Bake the Cheesecake
Bake in the preheated oven for 55-60 minutes, watching closely until the center is set but still slightly jiggly (it will firm up as it cools).
Step 7: Cool and Chill
Allow the cheesecake to cool at room temperature before refrigerating it for at least 4 hours or overnight. This step is crucial for achieving that perfect, creamy texture.
Step 8: Garnish and Serve
Before serving, top each slice with a generous dollop of whipped cream, a sprinkle of mini marshmallows, and an irresistible drizzle of chocolate sauce.
Serving Suggestions & Pairings
Serve this decadent cheesecake alongside a warm cup of spiced cocoa or a dark brewed coffee for an added layer of warmth. Share slices with friends during holiday gatherings or surprise your loved ones during movie nights—there’s never a wrong time for cheesecake!
Storage & Leftovers Guide
Store any leftovers in an airtight container in the refrigerator, where they will keep well for up to 5 days. You can also freeze slices for up to a month; just make sure to wrap them tightly to prevent freezer burn.
Kitchen Wisdom & Success Tips
- Room Temperature: Make sure your cream cheese is at room temperature to ensure a smooth batter with no lumps.
- Don’t Overmix: Overmixing can incorporate too much air, leading to cracks in the cheesecake.
- Use a Water Bath: For a creamier texture and to prevent cracks, you can use a water bath by placing the springform pan inside a larger pan filled with water.
Flavor Variations & Adaptations
Want to switch things up? Try adding peppermint extract for a festive twist or experiment with different types of chocolate—like white or dark— to create a unique cheesecake flavor.
Reader Questions & Solutions
-
Why is my cheesecake cracked?
Cracks often form from too much mixing or baking at too high a temperature. Make sure to mix gently and follow the baking instructions carefully. -
Can I use low-fat cream cheese?
Yes, but keep in mind that it may alter the texture. Full-fat cream cheese provides the best results in flavor and consistency. -
How do I know when my cheesecake is done?
The edges should be set, while the center remains slightly jiggly. It will firm up as it cools. -
Can I make this in advance?
Absolutely! This cheesecake is often even better after chilling overnight, allowing the flavors to meld together. -
What toppings can I use?
Besides the suggested options, consider crushed peppermint candies, chocolate shavings, or even a fruit compote for a refreshing contrast.
Wrapping Up
This Hot Chocolate Cheesecake is more than just a dessert; it’s a celebration of flavors and memories, perfect for creating lasting moments with the people you love most. As you prepare this scrumptious treat, take your time; each step of the process brings you closer to a delightful payoff. I hope you enjoy baking and, most importantly, indulging in every creamy bite! Happy baking!
PrintHot Chocolate Cheesecake
A delicious cheesecake that combines the flavors of hot chocolate with a creamy filling, topped with whipped cream, marshmallows, and chocolate sauce.
- Prep Time: 30 minutes
- Cook Time: 60 minutes
- Total Time: 360 minutes
- Yield: 10-12 servings 1x
- Category: Dessert
- Method: Baking
- Cuisine: American
- Diet: Vegetarian
Ingredients
- 1 and 1/2 cups graham cracker crumbs
- 1/4 cup sugar
- 1/2 cup unsalted butter, melted
- 4 (8-ounce) packages cream cheese, softened
- 1 cup granulated sugar
- 1 teaspoon vanilla extract
- 4 large eggs
- 1 cup sour cream
- 1/2 cup cocoa powder
- 1 cup semi-sweet chocolate chips
- Whipped cream for topping
- Mini marshmallows for topping
- Chocolate sauce for drizzling
Instructions
- Preheat the oven to 325°F (160°C).
- Combine graham cracker crumbs, sugar, and melted butter in a bowl, then press into a springform pan.
- Beat the softened cream cheese until smooth, then add sugar and vanilla extract.
- Add the eggs one at a time, blending well after each addition.
- Stir in sour cream, cocoa powder, and melted chocolate chips until mixed.
- Pour the batter over the prepared crust.
- Bake for 55-60 minutes until the center is set but still slightly jiggly.
- Cool at room temperature before refrigerating for at least 4 hours.
- Top each slice with whipped cream, mini marshmallows, and chocolate sauce before serving.
Notes
For a creamier texture, consider using a water bath while baking the cheesecake.
Nutrition
- Serving Size: 1 slice
- Calories: 400
- Sugar: 22g
- Sodium: 300mg
- Fat: 30g
- Saturated Fat: 18g
- Unsaturated Fat: 10g
- Trans Fat: 0g
- Carbohydrates: 30g
- Fiber: 1g
- Protein: 7g
- Cholesterol: 200mg