
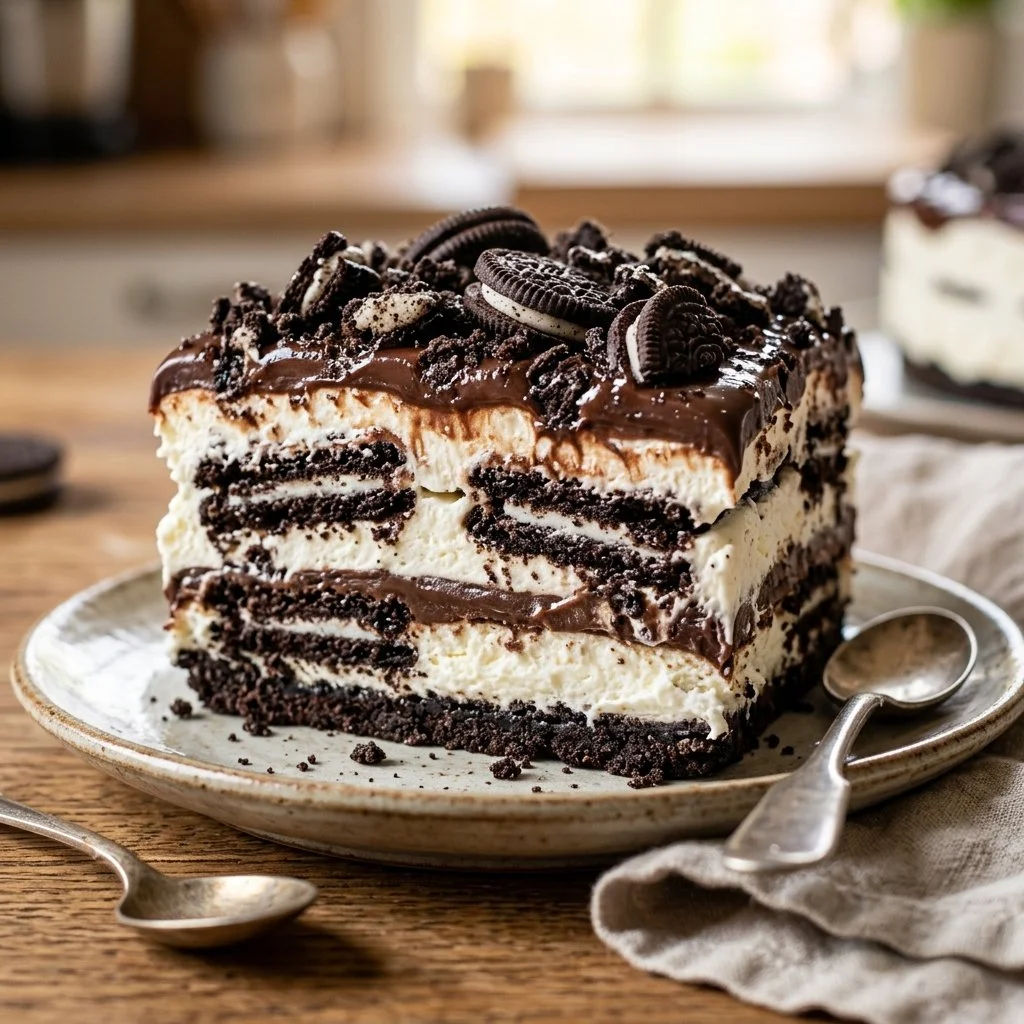
There’s an undeniable magic in the air when an Oreo Icebox Cake makes its debut at a gathering. I can still remember the first time I had a slice of this delightful dessert during a backyard barbecue at my cousin’s house. Summer sunlight danced across the patio, the sweet smell of treats mingled with the fresh grass, and when I took that first bite, oh—those creamy layers with crunchy cookies felt like a hug from childhood! It’s a nostalgic taste that brings family and friends together, and it’s easier to make than you might think. So, grab your mixing bowl and let’s create some sweet memories!
Recipe Timing
- Prep Duration: 20 minutes
- Active Cooking: None
- Total Duration: 4 hours (preferably overnight)
- Portion Size: Serves 12
- Complexity: Simple
Nutritional Recipe
- Calories per portion: Approximately 350
- Protein: 3g
- Carbs: 41g
- Fats: 19g
- Fiber: 1g
- Sugars: 29g
- Sodium: 200mg
Why You’ll Love This Oreo Icebox Cake
Imagine layers of cookies so tender they melt in your mouth, complemented by a luscious, creamy mixture that is both sweet and satisfying. This Oreo Icebox Cake is a celebration of simplicity and indulgence rolled into one spectacular dessert. Perfect for any occasion or just a weeknight treat, this recipe requires no baking—just a little patience as it chills into creamy perfection. Plus, it’s a fun recipe to whip up with kids, allowing them to get their hands in the mix by layering the cookies.
The Complete Cooking Journey
This delightful dessert comes together quickly, with minimal effort but maximum reward. You’ll get to play with flavors and textures, layering delicious Oreo cookies with a smooth and whipped cream cheese mixture, creating a beautiful and tasty centerpiece for any table. Just a few hours chilling in the fridge, and you have a party-ready dessert that looks as good as it tastes!
Ingredients:
- 2 packages of Oreo cookies
- 1 package (8 oz) of cream cheese, softened
- 1 cup of sugar
- 1 teaspoon of vanilla extract
- 1 container (12 oz) of whipped topping, thawed
- 2 cups of milk
Method:
Step 1: Whip Up the Cream Cheese Mixture
In a mixing bowl, combine softened cream cheese, sugar, and vanilla extract until smooth. This creamy base is the heart of your cake, promising richness in every slice.
Step 2: Add the Whipped Topping
Now, gently fold in the whipped topping into the cream cheese mixture. Be careful not to deflate the mixture—you want to keep it fluffy because that’s where the magic happens!
Step 3: Dip the Oreos in Milk
Grab a plate filled with your milk. Now, dip the Oreo cookies into the milk for about 1 second. You want them soft but not mushy! Then, layer them in a 9×13 inch dish to create the first layer of this delicious cake.
Step 4: Spread the Cream Cheese Layer
Using a spatula, spread a layer of the cream cheese mixture over the cookies, ensuring every nook and cranny is filled with that creamy goodness.
Step 5: Keep Layering
Repeat the process of layering the dipped cookies and cream mixture until you run out of ingredients. Make sure to finish with a final layer of the cream mixture on top for that dreamy finish.
Step 6: Chill to Perfectness
Cover your dish and refrigerate for at least 4 hours, but if you can wait overnight, you’ll be rewarded with a cake that has set beautifully.
Step 7: Slice and Serve
When you’re ready to indulge, slice the cake into squares and serve. Watch as everyone’s eyes light up with joy!
Serving Suggestions & Pairings
Oreo Icebox Cake is a fantastic standalone dessert, but if you want to elevate your presentation, consider serving with fresh berries or a drizzle of chocolate sauce on the plate. It pairs beautifully with a warm cup of coffee or a refreshing glass of iced tea. For gatherings, why not set up a mini dessert bar with extra Oreos, sprinkles, or whipped cream for guests to personalize their slices?
Storage & Leftovers Guide
You can store any leftover cake in an airtight container in the fridge for up to 3 days. Just keep in mind that the longer it sits, the softer the cookies will get, which can be deliciously decadent!
Kitchen Wisdom & Success Tips
- If you’re in a rush, you can mix the cream cheese mixture a few hours before the gathering; just make sure it chills long enough to set.
- For a touch of chocolate, consider adding a layer of chocolate pudding between the cookies and cream layers!
- If you want to tone down the sweetness slightly, try reducing the sugar by 1/4 cup and see if it fits your palate.
Flavor Variations & Adaptations
Love peanut butter? Try folding it into the cream cheese mixture for a peanut butter Oreo cake! Alternatively, a touch of espresso powder can give your cake a gourmet coffee flavor. Gluten-free options can be made by using gluten-free Oreo cookies for those with dietary restrictions.
Reader Questions & Solutions
-
Question: Can I use a different type of cookie?
Solution: Absolutely! Although Oreos are traditional, feel free to experiment with chocolate wafers or even graham crackers! -
Question: What if I don’t have whipped topping?
Solution: You can make your own by whipping heavy cream until soft peaks form, then folding it into your cream cheese mixture. -
Question: How long does it really need to chill?
Solution: For best results, let it chill overnight, but a minimum of 4 hours is essential to set the layers. -
Question: Can this dessert be frozen?
Solution: Yes, you can freeze it! Just make sure to cover it tightly; it can last up to a month. Thaw in the fridge when you’re ready to enjoy it. -
Question: What do I do if the cream cheese is lumpy?
Solution: Make sure your cream cheese is softened at room temperature. If lumpy, you might want to whip it a bit longer before adding the other ingredients.
Wrapping Up
And just like that, you’ve turned a handful of simple ingredients into a stunning and delicious Oreo Icebox Cake that’s bound to be the star of your next gathering. Every slice is a mix of nostalgia and joy, bringing back the warmth and fun of family while creating new delicious memories together. So gather your ingredients, roll up your sleeves, and let the magic happen—this cake is waiting for you! Happy baking!
PrintOreo Icebox Cake

A nostalgic no-bake dessert featuring layers of Oreo cookies and a creamy mixture, perfect for gatherings.
- Prep Time: 20 minutes
- Cook Time: 0 minutes
- Total Time: 240 minutes
- Yield: 12 servings 1x
- Category: Dessert
- Method: Refrigeration
- Cuisine: American
- Diet: Vegetarian
Ingredients
- 2 packages of Oreo cookies
- 1 package (8 oz) of cream cheese, softened
- 1 cup of sugar
- 1 teaspoon of vanilla extract
- 1 container (12 oz) of whipped topping, thawed
- 2 cups of milk
Instructions
- Whip the cream cheese mixture: In a mixing bowl, combine softened cream cheese, sugar, and vanilla extract until smooth.
- Add the whipped topping: Gently fold in the whipped topping into the cream cheese mixture.
- Dip the Oreos in milk: Dip the Oreo cookies into the milk for about 1 second and layer them in a 9×13 inch dish.
- Spread the cream cheese layer: Spread a layer of the cream cheese mixture over the cookies.
- Keep layering: Repeat the process of layering cookies and cream mixture until ingredients run out.
- Chill to perfection: Cover and refrigerate for at least 4 hours or overnight.
- Slice and serve: Slice the cake into squares and serve.
Notes
Can be served with fresh berries or chocolate sauce. Store leftovers in an airtight container in the fridge for up to 3 days.
Nutrition
- Serving Size: 1 serving
- Calories: 350
- Sugar: 29g
- Sodium: 200mg
- Fat: 19g
- Saturated Fat: 10g
- Unsaturated Fat: 6g
- Trans Fat: 0g
- Carbohydrates: 41g
- Fiber: 1g
- Protein: 3g
- Cholesterol: 30mg