
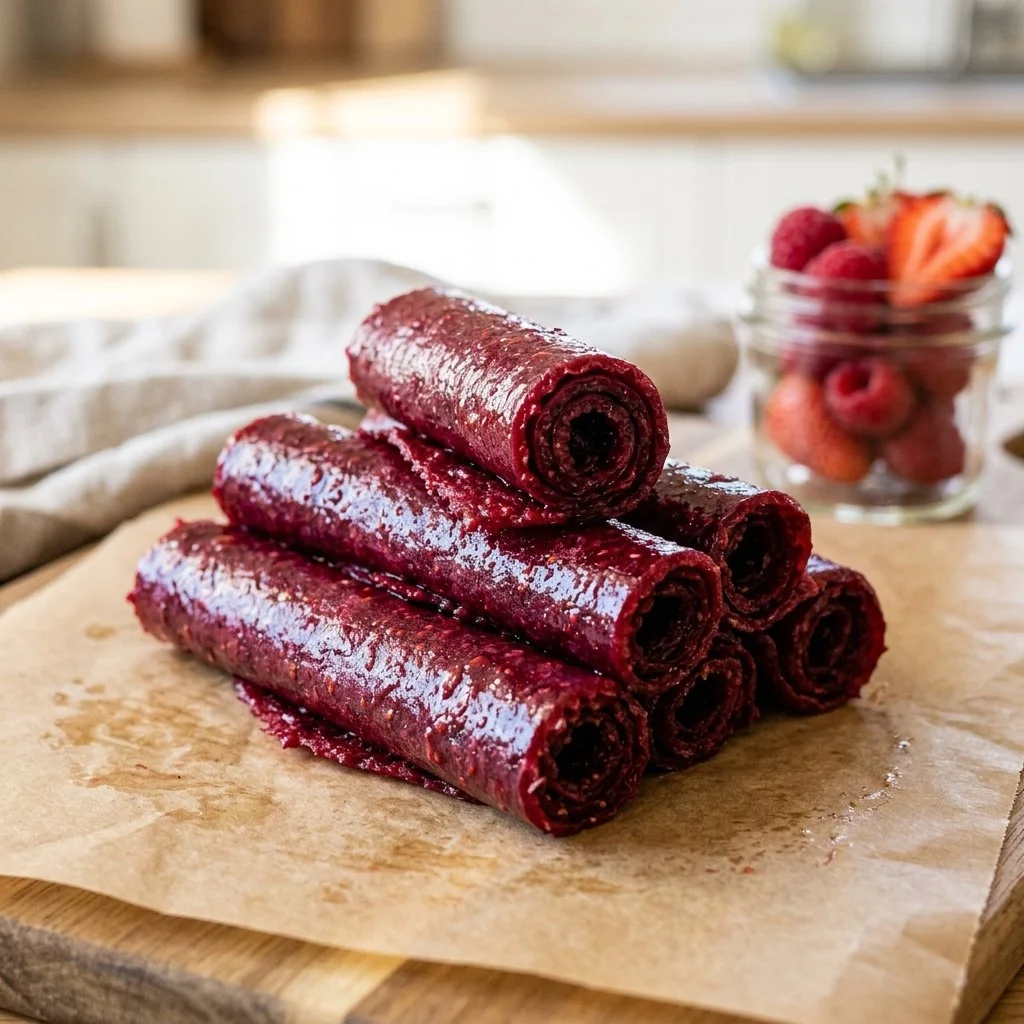
There’s something magical about transforming fresh, vibrant fruits into delicious homemade treats. It reminds me of lazy summer afternoons spent with my grandmother in her sunlit kitchen, where the air was filled with the sweet scents of strawberries and mangoes. She had a knack for turning simple ingredients into delights, and one of our favorite projects was making fruit roll-ups. With every swirling blend of fruity goodness, we would laugh, taste, and create memories wrapped in the chewy, tangy sweetness of our own creations. Today, I want to share that experience with you, giving you the chance to recreate these delightful homemade fruit roll-ups in your own kitchen. Trust me; they’re a hit with kids and adults alike!
Recipe Timing
- Prep Duration: 15 minutes
- Active Cooking: 5-8 hours (mostly unattended time)
- Total Duration: 5-8 hours and 15 minutes
- Portion Size: Makes about 10-12 strips
- Complexity: Simple
Nutritional Recipe
- Calories per portion: Approximately 60 calories
- Protein: 0.5 grams
- Carbs: 15 grams
- Fats: 0.2 grams
- Fiber: 1 gram
- Sugars: 12 grams
- Sodium: 1 mg
Why You’ll Love This Homemade Fruit Roll-Ups
These fruit roll-ups are not just snacks; they are small packets of joy filled with the taste of sunshine. They’re sweetened naturally, making them a wholesome choice for kids’ lunch boxes or a quick afternoon pick-me-up. Each bite is composed of real fruit, allowing you to feel great about what you’re indulging in, with no preservatives or artificial flavors. They’re perfect for on-the-go snacking or a guilt-free treat that can satisfy a sweet tooth without the added sugars of commercial candies.
The Complete Cooking Journey
Making homemade fruit roll-ups is a fulfilling journey, from blending fresh fruits to watching your creation dry slowly in the oven, filling your home with inviting aromas. This process is both nourishing and therapeutic, and it invites creativity. Not to mention, it’s an excellent way to utilize fruits that are past their prime, rescuing them from the compost bin and turning them into something delicious!
Ingredients:
- 2 cups of your favorite fruit puree (such as strawberries, mangoes, or apples)
- 1 tablespoon honey or agave syrup (optional)
- 1 tablespoon lemon juice
Method:
Step 1: Preheat Your Oven
Preheat your oven to 170°F (75°C). This low temperature will ensure that the fruit dries out slowly, preserving the vibrant flavors while creating a soft, chewy texture.
Step 2: Blend the Fruit
In a blender, add your chosen fruit and puree it until smooth. If you like a hint of sweetness, add honey or agave syrup along with the lemon juice, and blend until everything is well combined. The lemon juice not only brightens the flavor but also helps to preserve the color and freshness of your fruit.
Step 3: Prepare Your Baking Sheet
Line a baking sheet with parchment paper, ensuring it’s large enough to hold the fruit puree. This will make it easier to remove your roll-ups once they’re baked.
Step 4: Spread the Puree
Gently spread the fruit puree evenly over the parchment-lined baking sheet, aiming for a thickness of about 1/8 inch. The thinner you spread it, the quicker it will dry, so keep this in mind based on your preferences for texture.
Step 5: Bake to Perfection
Place the baking sheet in the preheated oven and bake for 5-8 hours. Yes, it’s a slow process, but patience is key! You’ll know it’s ready when the fruit leather is dry but still slightly tacky to the touch, making it perfect for rolling.
Step 6: Cool and Slice
Once cool, carefully cut the dried fruit leather into strips with kitchen scissors or a sharp knife. Then, roll them up and store them in an airtight container at room temperature.
Serving Suggestions & Pairings
These homemade fruit roll-ups make a fantastic snack alone, but they also shine when paired with yogurt for breakfast or as part of a lunchbox spread. Try presenting them alongside a mix of nuts or cheese for a charming snack platter!
Storage & Leftovers Guide
Store your fruit roll-ups in an airtight container at room temperature, where they can last for up to two weeks. If you prefer, you can refrigerate them for extended freshness, but allow them to come back to room temperature before enjoying.
Kitchen Wisdom & Success Tips
- Be sure to puree your fruit thoroughly for a smooth texture.
- Experiment with different fruits and combinations for varied flavors—berry blends or tropical mixes can be delightful!
- Make sure to check the fruit leather regularly while baking. Each oven can vary slightly in cooking times.
Flavor Variations & Adaptations
Mix up your fruit choices—apples and cinnamon for a fall-inspired roll-up or a tropical mango and pineapple blend for a summer treat. You can even sneak in some pureed vegetables like spinach or carrots for a hidden health boost!
Reader Questions & Solutions
-
Can I use frozen fruit?
Absolutely! Just thaw and drain the fruit before pureeing. -
What if my fruit leather is too sticky?
Bake it a little longer or let it cool and air dry before storing. -
How do I know when it’s done baking?
It should be dry but still slightly tacky to the touch and not sticky when you press your finger against it. -
Can I add spices or flavoring?
Yes! A dash of cinnamon or vanilla can add exciting flavors. -
Is there a substitute for honey?
Agave syrup or maple syrup works perfectly if you’re looking for a vegan alternative.
Wrapping Up
There’s something undeniably rewarding about creating your own snacks at home. Homemade fruit roll-ups are not just healthier; they encapsulate the joy of cooking, sharing, and savoring homemade goodness. So gather your fruits, turn on your oven, and let this delightful process unfold in your kitchen. Embrace the creativity and love that comes with making these chewy treats, and savor the satisfaction that comes with every bite—because there’s nothing quite like a snack made from the heart! Happy cooking!
PrintHomemade Fruit Roll-Ups
Delightful homemade fruit roll-ups made from your favorite fruit purees, perfect for snacks or lunch boxes.
- Prep Time: 15 minutes
- Cook Time: 480 minutes
- Total Time: 495 minutes
- Yield: 10-12 strips 1x
- Category: Snacks
- Method: Baking
- Cuisine: American
- Diet: Vegan
Ingredients
- 2 cups of your favorite fruit puree (such as strawberries, mangoes, or apples)
- 1 tablespoon honey or agave syrup (optional)
- 1 tablespoon lemon juice
Instructions
- Preheat your oven to 170°F (75°C).
- Blend the fruit until smooth, adding honey or agave syrup and lemon juice if desired.
- Prepare a baking sheet with parchment paper.
- Spread the fruit puree evenly on the baking sheet, aiming for a thickness of about 1/8 inch.
- Bake for 5-8 hours until the fruit leather is dry but slightly tacky.
- Cool and cut into strips, then roll them up and store in an airtight container.
Notes
Store your fruit roll-ups in an airtight container for up to two weeks. You can refrigerate them for extended freshness.
Nutrition
- Serving Size: 1 strip
- Calories: 60
- Sugar: 12g
- Sodium: 1mg
- Fat: 0.2g
- Saturated Fat: 0g
- Unsaturated Fat: 0g
- Trans Fat: 0g
- Carbohydrates: 15g
- Fiber: 1g
- Protein: 0.5g
- Cholesterol: 0mg