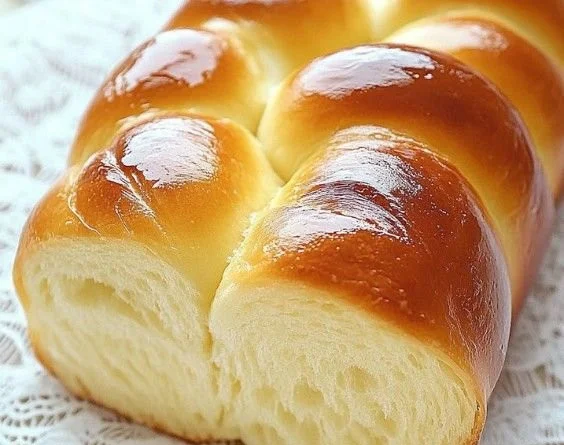
Nothing quite compares to the warm aroma of freshly baked bread filling the kitchen, inviting you into its cozy embrace. It’s a scent that takes me back to my childhood, where my grandmother would spend her evenings kneading dough, effortlessly crafting loaves that would soon become our dinner centerpiece. This whirlwind of memories came rushing back to me as I recently decided to recreate her magic with a recipe that has become a staple in my home: Beth’s Simple and Delicious Condensed Milk Bread. It’s divine, trust me!
Imagine a bread that is soft, slightly sweet, and just perfect for everything from breakfast to dinner. This is the kind of bread that gives you a reason to wake up early, not because you have to, but because you can’t resist a slice of it fresh out of the oven. Let’s dive into the details of creating this wonderful loaf that blends a touch of nostalgia with simplicity.
Recipe Timing
- Prep Duration: 15 minutes
- Active Cooking: 30-35 minutes
- Total Duration: 1 hour 45 minutes (including rising time)
- Portion Size: Serves 8
- Complexity: Simple
Nutritional Recipe
- Calories per portion: Approximately 180
- Protein: 4g per serving
- Carbs: 33g per serving
- Fats: 4g per serving
- Fiber: 1g per serving
- Sugars: 5g per serving
- Sodium: 150mg per serving
Why You’ll Love This Beth’s Simple and Delicious Condensed Milk Bread
Beth’s bread is more than just a delicious recipe; it’s a bridge to joyful moments shared around the table. The sweetened condensed milk offers a richness that complements the bread’s fluffy texture, making each bite a revelation. It’s perfect for slathering with butter, layering with your favorite sandwich fillings, or simply enjoying as is. Plus, it’s incredibly simple to make, giving you the satisfaction of homemade bread without the fuss!
The Complete Cooking Journey
Get ready for an adventure in your kitchen as we transform humble ingredients into a heavenly loaf of bread. This recipe is not just about the final product; it’s about embracing the process, enjoying the tactile feel of the dough, and savoring the anticipation as it rises. Let’s get into it!
Ingredients:
- 2 cups all-purpose flour
- 1/2 cup sweetened condensed milk
- 1/2 cup warm water
- 1 tablespoon sugar
- 1 teaspoon salt
- 1 tablespoon active dry yeast
- 2 tablespoons butter, melted
Method:
Step 1: Activate the Yeast
In a small bowl, combine warm water, sugar, and yeast, and let sit for about 5 minutes until frothy. This is where the magic begins, as the yeast activates and gets ready to help our bread rise beautifully.
Step 2: Combine Dry Ingredients
In a large mixing bowl, combine flour and salt. Stir them together to ensure even distribution of the salt, which is crucial for flavor.
Step 3: Mix the Dough
Add the yeast mixture and condensed milk to the flour. Mix until a dough forms. You’ll see the transformation as the liquid ingredients meld into the flour, creating a sticky but cohesive mixture.
Step 4: Knead the Dough
Knead the dough on a floured surface for about 10 minutes until smooth. This step is not only therapeutic, but it also develops the gluten, giving our bread that lovely chewy texture we crave.
Step 5: Let the Dough Rise
Place the dough in a greased bowl, cover, and let rise in a warm place until doubled in size, about 1 hour. This is where patience pays off—watching it grow is a delightful experience.
Step 6: Preheat the Oven
Preheat the oven to 350°F (175°C), preparing for the warm and inviting scent that will soon fill your home.
Step 7: Shape the Bread
Once risen, shape the dough into a loaf and place it in a greased loaf pan. This is where you get to shape your creation and envision the golden-brown crust.
Step 8: Final Rise
Allow to rise again for about 30 minutes. A second rise is crucial for that light texture—don’t skip it!
Step 9: Bake to Perfection
Bake for 30-35 minutes until golden brown. Keep an eye on it—this is the moment of truth when your kitchen aromatic dreams come to life.
Step 10: Cool Before Slicing
Let cool before slicing. I know, it’s hard to resist, but letting it cool will make your slicing much easier and maintain the integrity of the bread.
Serving Suggestions & Pairings
This bread is incredibly versatile. Enjoy a slice with butter and a sprinkle of cinnamon for breakfast, use it for sandwiches with savory fillings for lunch, or serve it warm alongside your favorite soup for dinner. Don’t forget to pair it with a sweet jam or homemade fruit preserves for a delightful dessert.
Storage & Leftovers Guide
Keep any leftover bread in an airtight container at room temperature for up to 3 days. To extend its life, wrap it tightly and freeze for up to a month. Just pop it in the toaster or a warm oven to bring it back to life.
Kitchen Wisdom & Success Tips
- Make sure your water isn’t too hot; it should be warm to the touch, about 110°F (43°C), which will effectively activate the yeast without killing it.
- Experiment with adding herbs or spices (like cinnamon or rosemary) to the dough for a unique flavor twist.
- If your dough isn’t rising well, check your yeast’s expiration date; old yeast can lead to flat bread.
Flavor Variations & Adaptations
Feeling adventurous? Try substituting half of the all-purpose flour with whole wheat flour for a nuttier flavor. You can also explore different milk types—coconut or evaporated milk can bring a whole new dimension to this recipe. Add in mix-ins such as chocolate chips, nuts, or dried fruits for a fun twist!
Reader Questions & Solutions
- Why isn’t my dough rising?
- Make sure your yeast is fresh and that you’re providing a warm environment. If it’s too cold, the yeast will stay dormant.
- Can I make this bread without condensed milk?
- Yes! Substitute with an equal amount of milk and a tablespoon of sugar to replicate sweetness.
- How can I tell if my bread is done baking?
- The crust should be golden brown, and when you tap the bottom of the loaf, it should sound hollow.
- What can’t I do with leftover bread?
- Slice and freeze it! You can also make breadcrumbs or croutons for a salad.
- Is it possible to double the recipe?
- Absolutely! Just ensure you have a large enough mixing bowl and sufficient baking pans. Adjust rising times as needed.
Wrapping Up
Beth’s Simple and Delicious Condensed Milk Bread is more than just a recipe; it’s an invitation to create memories in your kitchen. With simple steps and comforting flavors, you can create a beautiful loaf that sparks joy in every bite. So tie on that apron and indulge in a little baking therapy; the delicious rewards will be well worth it. Happy baking!
PrintBeth’s Simple and Delicious Condensed Milk Bread
A soft, slightly sweet bread made with condensed milk, perfect for breakfast, lunch, or dinner.
- Prep Time: 15 minutes
- Cook Time: 30 minutes
- Total Time: 105 minutes
- Yield: 8 servings 1x
- Category: Bread
- Method: Baking
- Cuisine: American
- Diet: Vegetarian
Ingredients
- 2 cups all-purpose flour
- 1/2 cup sweetened condensed milk
- 1/2 cup warm water
- 1 tablespoon sugar
- 1 teaspoon salt
- 1 tablespoon active dry yeast
- 2 tablespoons butter, melted
Instructions
- Activate the yeast by combining warm water, sugar, and yeast in a bowl and letting it sit for 5 minutes.
- Combine dry ingredients in a large bowl: flour and salt.
- Mix the yeast mixture and condensed milk into the flour until a dough forms.
- Knead the dough on a floured surface for 10 minutes until smooth.
- Let the dough rise in a greased bowl until doubled in size, about 1 hour.
- Preheat the oven to 350°F (175°C).
- Shape the dough into a loaf and place in a greased loaf pan.
- Allow to rise again for 30 minutes.
- Bake for 30-35 minutes until golden brown.
- Cool before slicing.
Notes
Make sure the water doesn’t exceed 110°F (43°C) to activate the yeast properly. Substitute half of the flour for whole wheat for a nuttier flavor.
Nutrition
- Serving Size: 1 slice
- Calories: 180
- Sugar: 5g
- Sodium: 150mg
- Fat: 4g
- Saturated Fat: 2g
- Unsaturated Fat: 2g
- Trans Fat: 0g
- Carbohydrates: 33g
- Fiber: 1g
- Protein: 4g
- Cholesterol: 10mg