There’s something irresistibly nostalgic about biting into a cold dessert on a hot day, especially one that harks back to childhood favorites. I remember my grandmother’s kitchen during summer, filled with the delightful aroma of freshly baked pies and creamy puddings. Amongst the nostalgia, banana pudding was always a star player—sweet, creamy, and dotted with soft bananas and crunchy vanilla wafers. Now, as an adult, I love reinventing this classic dessert into something modern yet familiar.
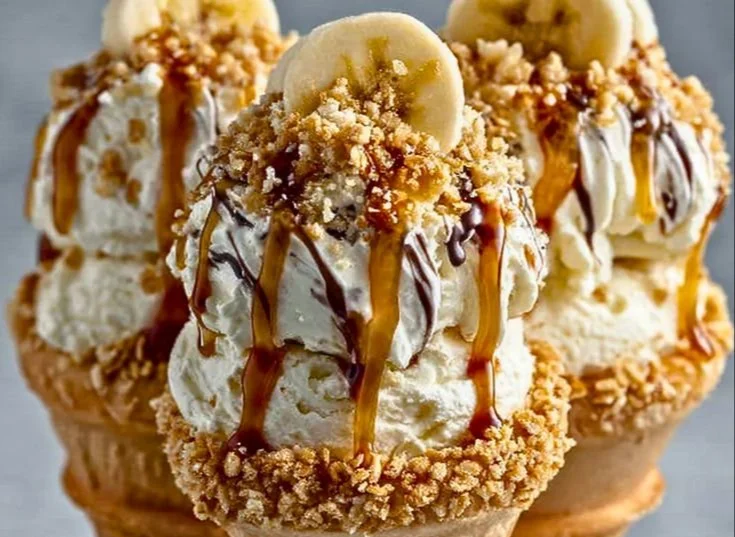
Enter the Banana Pudding Cheesecake Cones! Imagine enjoying the creamy layers of a banana pudding cheesecake perfectly packed into a crispy, crunchy ice cream cone. It’s like a fun ice cream sundae but with all the gooey goodness of banana pudding. Whether you’re planning a summer gathering, celebrating a birthday, or just looking to indulge, these cones offer a playful twist that will delight everyone.
Recipe Timing
- Prep Duration: 15 minutes
- Active Cooking: 0 minutes
- Total Duration: 15 minutes (plus any chilling time)
- Portion Size: Serves 8
- Complexity: Simple
Nutritional Recipe
- Calories per portion: Approximately 250
- Protein: 3 grams per serving
- Carbs: 35 grams per serving
- Fats: 12 grams per serving
- Fiber: 1 gram per serving
- Sugars: 18 grams per serving
- Sodium: 200 mg per serving
Why You’ll Love This Banana Pudding Cheesecake Cones
These delightful cones combine the essence of two beloved desserts—banana pudding and cheesecake! They’re crispy where it counts, creamy on the inside, and topped with deliciously sweet bananas and crunchy vanilla wafers. Plus, they’re ready in a flash, making them a perfect last-minute treat to wow your friends or enrich a family dinner. What’s more, they’re served in individual cones, meaning there’s no fuss with dishes. Just grab one and dig in!
The Complete Cooking Journey
Creating these Banana Pudding Cheesecake Cones is not just a cooking process—it’s an adventure filled with layers of flavors and textures that are sure to bring smiles. Let’s dive into the mix of creamy cheesiness combined with the sweetness of ripe bananas, all topped off with the fun crunch of crushed vanilla wafers.
Ingredients:
- 1 cup banana pudding mix
- 2 cups milk
- 8 oz cream cheese, softened
- 1 cup whipped cream
- 1 tsp vanilla extract
- 8 ice cream cones
- Sliced bananas
- Crushed vanilla wafers
Method:
Step 1: Whisk the Pudding
In a bowl, whisk together the banana pudding mix and milk until smooth. This creates the delicious base for our cone filling.
Step 2: Beat the Cream Cheese
In another bowl, beat the cream cheese until creamy, then fold in the whipped cream and vanilla extract. This rich layer will give the cones their cheesecake flavor.
Step 3: Combine the Mixtures
Combine the pudding mixture with the cream cheese mixture until well blended. Make sure it’s smooth and creamy, embracing the banana pudding goodness.
Step 4: Assemble the Cones
Spoon the mixture into the ice cream cones, layering with sliced bananas and crushed vanilla wafers as desired. Get creative! The more layers, the better.
Step 5: Serve and Enjoy!
Serve immediately for a fresh treat or refrigerate until ready to serve. Enjoy the delightful crunch and creamy layers whenever the craving strikes!
Serving Suggestions & Pairings
These Banana Pudding Cheesecake Cones would pair beautifully with a dollop of chocolate sauce or a scoop of vanilla ice cream on the side for an extra special treat. For a refreshing twist, consider adding a sprig of mint on top when serving. They also make for a great dessert centerpiece at birthday parties or summer cookouts!
Storage & Leftovers Guide
If you happen to have any leftovers (which is rare!), cover the cones with plastic wrap and store them in the fridge for up to 2 days. However, for the best taste and texture, it’s ideal to enjoy them fresh.
Kitchen Wisdom & Success Tips
- Prep Ahead: You can prepare the pudding mixture a few hours in advance. Just keep it chilled until you’re ready to assemble the cones.
- Avoid Soggy Cones: If you’re concerned about the cones getting soggy, you can brush a thin layer of melted chocolate on the inside of the cones and let it set before filling them.
- Banana Alternatives: If bananas aren’t your thing, other fruits like strawberries or peaches work beautifully in this recipe!
Flavor Variations & Adaptations
Feel free to get creative! You can create layers using other flavors like chocolate pudding or even butterscotch for a unique take. Try swapping out crushed vanilla wafers for graham cracker crumbs or chocolate cookie crumbs for a twist!
Reader Questions & Solutions
-
Can I make this in advance?
Yes, you can prepare the filling a day in advance and fill the cones closer to your serving time to keep them crispy. -
What can I substitute for whipped cream?
If you’re looking for a lighter option, you can use cool whip or a whipped yogurt for a healthier alternative. -
Can I use different types of cones?
Absolutely! Chocolate-dipped cones or sugar cones would add a delightful twist! -
How do I prevent the cones from getting soggy?
As mentioned earlier, melting some chocolate inside the cones or serving them relatively quickly will help maintain their crunch. -
Can I use dairy-free ingredients?
You can substitute the cream cheese with a dairy-free alternative and use coconut milk for the pudding to keep it dairy-free!
Wrapping Up
So there you have it! These Banana Pudding Cheesecake Cones are an easy, delightful treat that brings a childhood favorite right into your home kitchen. They’re light, joyous, and sure to make every occasion feel special. I encourage you to give them a try, channeling your inner child as you indulge in the incredible flavors and textures. Happy cooking!
PrintBanana Pudding Cheesecake Cones

Delightful cones that combine the essence of banana pudding and cheesecake, filled with creamy layers and topped with bananas and vanilla wafers.
- Prep Time: 15 minutes
- Cook Time: 0 minutes
- Total Time: 15 minutes
- Yield: 8 servings 1x
- Category: Dessert
- Method: No-Bake
- Cuisine: American
- Diet: Vegetarian
Ingredients
- 1 cup banana pudding mix
- 2 cups milk
- 8 oz cream cheese, softened
- 1 cup whipped cream
- 1 tsp vanilla extract
- 8 ice cream cones
- Sliced bananas
- Crushed vanilla wafers
Instructions
- Whisk the pudding mix and milk in a bowl until smooth.
- Beat the cream cheese in another bowl until creamy, then fold in the whipped cream and vanilla extract.
- Combine the pudding mixture with the cream cheese mixture until well blended.
- Assemble the cones by spooning in the mixture and layering with sliced bananas and crushed vanilla wafers.
- Serve immediately or refrigerate until ready to serve.
Notes
Prevent soggy cones by brushing them with melted chocolate before filling. Use other fruits like strawberries for variety.
Nutrition
- Serving Size: 1 cone
- Calories: 250
- Sugar: 18g
- Sodium: 200mg
- Fat: 12g
- Saturated Fat: 4g
- Unsaturated Fat: 8g
- Trans Fat: 0g
- Carbohydrates: 35g
- Fiber: 1g
- Protein: 3g
- Cholesterol: 30mg