There’s something truly magical about baking. The way your kitchen transforms into a warm, comforting space filled with the irresistible aroma of freshly baked goods can turn even ordinary days into something special. I remember the first time I experimented with sourdough starter discard while trying to minimize waste in my kitchen. Inspired by the lovely tang of sourdough bread, I decided to whip up a batch of Sourdough Discard Dinner Rolls. As the rolls baked, the smell wafted through the house, making everyone gather in anticipation. Each roll was soft, fluffy, and full of flavor—comfort food at its finest. Now, I want to share this delightful recipe with you, so you too can create magical moments in your kitchen!
Recipe Timing
- Prep Duration: 15 minutes
- Active Cooking: 20 minutes
- Total Duration: 1 hour 30 minutes
- Portion Size: Serves 12 rolls
- Complexity: Simple
Nutritional Recipe
- Calories per portion: Approximately 120 calories
- Protein: 3 grams per serving
- Carbs: 24 grams per serving
- Fats: 2 grams per serving
- Fiber: 1 gram per serving
- Sugars: 1 gram per serving
- Sodium: 150 mg per serving
Why You’ll Love This Sourdough Discard Dinner Rolls
These Sourdough Discard Dinner Rolls are more than just a tasty side; they’re a testament to thoughtful cooking. By utilizing sourdough discard, you’re not only reducing food waste but also enriching your meals with a depth of flavor that’s hard to beat. Light and airy, with a slight tang, these rolls pair beautifully with soups, salads, and anything that needs a good bread component. Plus, they are perfect for those who appreciate that little bit of extra character in their food.
The Complete Cooking Journey
Baking these sourdough dinner rolls is a straightforward and rewarding experience. You start by mixing together the ingredients, allowing the dough to rise, and then shaping each roll. The best part? Watching them puff up in the oven, turning a golden brown as they bake. The anticipation builds, and when you finally pull them out of the oven, the temptation to tear into one right away is almost unbearable!
Ingredients:
- 1 cup sourdough starter discard (This is the secret ingredient for flavor and texture.)
- 4 cups all-purpose flour (To create the soft structure of the rolls.)
- 1/2 cup warm water (To help activate the yeast.)
- 2 tablespoons sugar (Adds sweetness to balance the sour notes.)
- 1 teaspoon salt (For flavor enhancement.)
- 1 tablespoon instant yeast (To help the rolls rise quickly.)
- 2 tablespoons butter (melted) (For brushing on top and adding richness.)
Method:
Step 1: Prepping Your Ingredients
Begin by gathering all your ingredients. This not only makes the process smoother but also builds excitement!
Step 2: Mixing the Dough
In a large bowl, combine the sourdough starter discard, warm water, sugar, and instant yeast. Mix well until combined. Gradually add the all-purpose flour and salt, mixing until a soft dough forms.
Step 3: Kneading for Perfection
Transfer the dough onto a floured surface and knead for about 5-7 minutes until it becomes smooth and elastic. This step is key as it develops the gluten that gives the rolls their structure.
Step 4: Letting it Rise
Place the kneaded dough in a lightly greased bowl, cover it with a clean kitchen towel, and let it rise for about 1 hour, or until it has doubled in size. Just imagine the yeasty aroma filling your kitchen as it rises!
Step 5: Shaping the Rolls
Once the dough has risen, punch it down to release the air. Divide it into 12 equal pieces and shape each piece into a round roll. Place them on a greased baking sheet, spacing them out to allow for more rising.
Step 6: Second Rise
Cover the shaped rolls with a kitchen towel and let them rise again for about 30 minutes, or until they’ve puffed up nicely. You’ll know they’re ready when they look fluffy and soft!
Step 7: Prepping for Baking
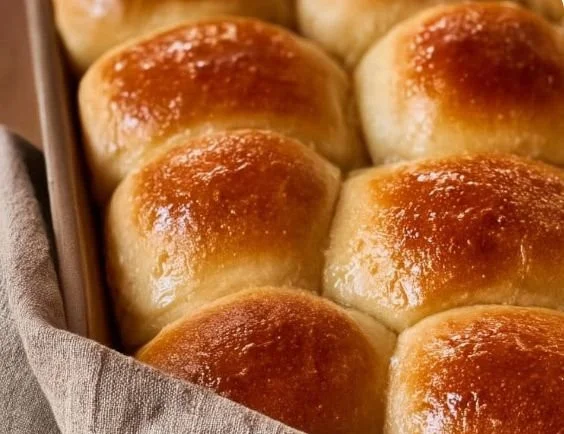
While the rolls are rising, preheat your oven to 375°F (190°C). Once they’ve risen, brush the tops with melted butter to give them that golden, glossy finish.
Step 8: Baking to Perfection
Bake the rolls in the preheated oven for 15-20 minutes, or until they are golden brown. The smell that fills your kitchen at this point will be nothing short of heavenly!
Step 9: Cooling Down
Transfer the baked rolls to a wire rack and let them cool slightly. This step is torturous but necessary to avoid burning your fingers as you try to sneak a taste!
Step 10: Enjoying Your Creation
Serve warm and enjoy how the soft, buttery texture melts in your mouth. These rolls are perfect on their own or accompanied by a spread of butter or jam!
Serving Suggestions & Pairings
These rolls are so versatile! Serve them alongside your favorite soups and stews, or as a base for sliders. They also make a delightful addition to brunch tables, paired with eggs and fresh fruit preserves. For a special touch, consider sprinkling herbs on top before baking for an herby twist!
Storage & Leftovers Guide
If you have any leftover rolls (which is rare in my household), store them in an airtight container at room temperature for up to 3 days. They can also be frozen for up to a month. Simply thaw at room temperature and reheat in the oven for a few minutes.
Kitchen Wisdom & Success Tips
- Ensure Your Yeast is Active: If you’re unsure about the freshness of your instant yeast, you can proof it by mixing it with warm water and sugar and waiting for bubbles to form.
- Kneading Technique: Use the heel of your hand to push the dough away from you, then fold it over. Continue this motion for effective kneading.
- Perfect Temperature: If your kitchen is cool, consider placing your dough in a slightly warm oven (turn it off after preheating) to encourage rising.
Flavor Variations & Adaptations
Feel free to experiment! Add herbs like rosemary or thyme for a savory note, or incorporate cheese for a gooey surprise inside. You could even roll in bits of garlic or sun-dried tomatoes for an exciting flavor explosion.
Reader Questions & Solutions
-
Can I use regular yeast instead of instant yeast?
Yes, you can use active dry yeast; just remember to proof it in warm water for about 5-10 minutes before mixing it with the other ingredients. -
What if my dough doesn’t rise?
Ensure your yeast is fresh and the dough is kept in a warm spot. Also, check that the water used isn’t too hot or too cold. -
How can I make these rolls dairy-free?
Replace butter with a plant-based alternative or use olive oil. -
Can I make the dough in advance?
Absolutely! You can prepare the dough and refrigerate it overnight. Just let it come back to room temperature before the second rise. -
What’s the best way to reheat frozen rolls?
Let them thaw in the fridge overnight, then reheat in the oven at 350°F for about 10-12 minutes.
Wrapping Up
I hope you’re excited to try these Sourdough Discard Dinner Rolls! Embrace the creativity baking allows you—these rolls are a perfect blend of simplicity and flavor, sure to impress your family and friends. Remember, there’s no wrong way to enjoy home-baked goodness. Celebrate these little culinary victories, one roll at a time! Happy baking!
PrintSourdough Discard Dinner Rolls

Delicious and fluffy dinner rolls made using sourdough starter discard, resulting in a light texture and rich flavor.
- Prep Time: 15 minutes
- Cook Time: 20 minutes
- Total Time: 90 minutes
- Yield: 12 rolls 1x
- Category: Side Dish
- Method: Baking
- Cuisine: American
- Diet: Vegetarian
Ingredients
- 1 cup sourdough starter discard
- 4 cups all-purpose flour
- 1/2 cup warm water
- 2 tablespoons sugar
- 1 teaspoon salt
- 1 tablespoon instant yeast
- 2 tablespoons butter (melted)
Instructions
- Begin by gathering all your ingredients.
- In a large bowl, combine the sourdough starter discard, warm water, sugar, and instant yeast. Mix well until combined.
- Transfer the dough onto a floured surface and knead for about 5-7 minutes until it becomes smooth and elastic.
- Place the kneaded dough in a lightly greased bowl, cover it with a clean kitchen towel, and let it rise for about 1 hour, or until it has doubled in size.
- Once the dough has risen, punch it down to release the air. Divide it into 12 equal pieces and shape each piece into a round roll.
- Cover the shaped rolls with a kitchen towel and let them rise again for about 30 minutes.
- While the rolls are rising, preheat your oven to 375°F (190°C). Brush the tops with melted butter.
- Bake the rolls in the preheated oven for 15-20 minutes, or until they are golden brown.
- Transfer the baked rolls to a wire rack and let them cool slightly.
- Serve warm and enjoy!
Notes
Store leftover rolls in an airtight container at room temperature for up to 3 days, or freeze for up to a month.
Nutrition
- Serving Size: 1 roll
- Calories: 120
- Sugar: 1g
- Sodium: 150mg
- Fat: 2g
- Saturated Fat: 1g
- Unsaturated Fat: 1g
- Trans Fat: 0g
- Carbohydrates: 24g
- Fiber: 1g
- Protein: 3g
- Cholesterol: 5mg