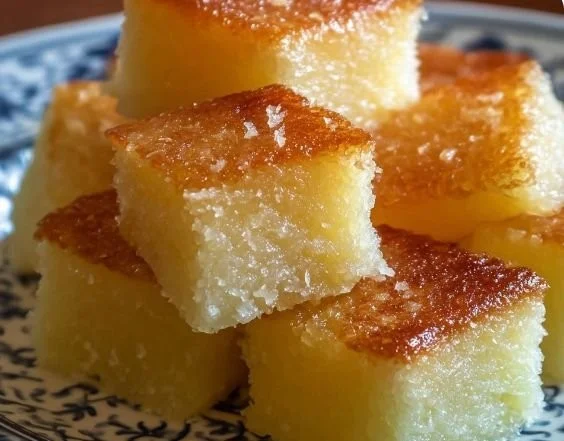
Hawaiian Butter Mochi has a special place in my heart. I remember the first time I tried it at a charming little café in Honolulu. As I took my first bite, the chewy texture combined with the rich coconut flavor sent my taste buds on a delightful adventure. Each morsel felt like a warm hug, comforting and satisfying. There’s something magical about how this dessert embodies the spirit of Hawaii, effortlessly blending tropical flavors and an inviting texture. This is a recipe that transports me back to those sun-soaked shores every time I make it, and I’m thrilled to share it with you!
Recipe Timing
- Prep Duration: 15 minutes
- Active Cooking: 45 minutes
- Total Duration: 1 hour
- Portion Size: Serves 12
- Complexity: Simple
Nutritional Recipe
- Calories per portion: 200
- Protein: 3g per serving
- Carbs: 30g per serving
- Fats: 8g per serving
- Fiber: 1g per serving
- Sugars: 10g per serving
- Sodium: 150mg per serving
Why You’ll Love This Hawaiian Butter Mochi
If you’re in search of a dessert that’s easy to make but impressive enough to wow your friends and family, look no further than Hawaiian Butter Mochi. It’s incredibly simple to whip up, yet the results are nothing short of spectacular. The slight crisp on top gives way to that signature chewy texture, while the coconut milk and eggs work their magic to create a richness that makes each bite feel indulgent. Plus, it’s a versatile treat—enjoy it as a snack, dessert, or even breakfast with a cup of coffee!
The Complete Cooking Journey
Let’s embark on this delicious adventure together! The great thing about this recipe is that you don’t need any special skills; just a willingness to learn and enjoy the process. Grab your apron and let’s get baking!
Ingredients
- 2 cups sweet rice flour (mochi flour) (Essential for achieving the chewy texture.)
- 1 cup granulated sugar
- 1 tablespoon baking powder
- 1 can coconut milk (13.5 oz)
- ½ cup unsalted butter, melted (Can be substituted with non-dairy butter.)
- 4 large eggs
- 1 teaspoon vanilla extract
- 1 cup milk (Add gradually until desired consistency.)
Method
Step 1: Preheat the Oven
First things first! Preheat your oven to 350°F (175°C). This step ensures that your mochi will bake evenly, giving you that beautifully perfect texture.
Step 2: Prepare the Baking Dish
While your oven warms up, grab an 8×8 inch baking dish and generously grease it with butter or non-stick spray. You want to make sure your mochi doesn’t stick, so don’t be shy with this step!
Step 3: Mix the Dry Ingredients
In a large bowl, combine 2 cups of sweet rice flour, 1 cup of granulated sugar, and 1 tablespoon of baking powder. Whisk them together until fully blended. This dry mixture is the foundation of your buttery delight!
Step 4: Combine the Wet Ingredients
In a separate bowl, whisk together 1 can of coconut milk, ½ cup of melted unsalted butter, 4 large eggs, and 1 teaspoon of vanilla extract. Mix until everything is well incorporated and you can almost smell the tropical aroma wafting from the bowl.
Step 5: Bring Them Together
Now it’s time for a little magic! Gradually add the wet ingredients to the dry ingredients, mixing gently to create a batter. Add 1 cup of milk as needed, until you reach a smooth, pourable consistency. Don’t worry if it seems a bit on the thin side; this is how it’s supposed to be!
Step 6: Bake to Perfection
Pour the batter into your prepared dish, spreading it evenly. Pop it into your preheated oven and bake for about 45 minutes, or until the top is golden brown and a toothpick inserted comes out clean.
Step 7: Cool the Mochi
Once baked, remove the dish from the oven and let it cool in the pan for about 15 minutes. This is the hardest part—waiting! The cooling process allows the texture to firm up slightly, making it easier to cut.
Step 8: Slice and Serve
After cooling, use a sharp knife to cut the mochi into squares. Serve it warm or at room temperature, and watch as your friends and family dive into this delicious treat!
Serving Suggestions & Pairings
Hawaiian Butter Mochi is lovely on its own, but pairing it with fresh fruit like pineapples or mangoes adds a bright contrast. Serve it alongside a scoop of vanilla ice cream for extra decadence, or with a side of whipped coconut cream for the full tropical experience. A drizzle of honey or chocolate sauce on top can also elevate this dessert to new heights!
Storage & Leftovers Guide
If you have leftovers (doubtful, but just in case!), store them in an airtight container at room temperature for up to 3 days. Alternatively, you can keep them in the refrigerator for about a week. If you want to store them for longer, slice them and freeze them in a sealed bag. Just pop them in the microwave for a few seconds to enjoy their chewy goodness again!
Kitchen Wisdom & Success Tips
- If you want to enhance the coconut flavor, add shredded coconut to your batter.
- Make sure your butter is melted for a smooth batter; if it’s too hot, let it cool slightly so you don’t cook the eggs.
- Using a toothpick holder as a guide can make slicing easier; it can help you achieve clean cuts without sticking!
Flavor Variations & Adaptations
Feeling adventurous? You can spice things up by adding a splash of almond extract or a teaspoon of matcha for added flavor. Incorporate citrus zest for a refreshing twist or fold in chocolate chips for a sweet surprise. The possibilities are endless!
Reader Questions & Solutions
-
Can I use regular rice flour instead of sweet rice flour?
- Regular rice flour won’t give you that chewy texture. Stick with sweet rice flour for authentic results.
-
Is it possible to make this gluten-free?
- Yes! The base recipe is already gluten-free, just check that you’re using certified gluten-free sweet rice flour.
-
What if I can’t find coconut milk?
- You can substitute with almond milk or another milk alternative, but it may alter the flavor and texture slightly.
-
How can I tell when it’s done baking?
- The top should be golden brown, and a toothpick inserted should come out clean or with a few moist crumbs.
-
Can I add toppings to the mochi?
- Absolutely! Drizzle with chocolate, caramel sauce, or sprinkle with powdered sugar for a fancy touch.
Wrapping Up
There you have it—a delightful Hawaiian Butter Mochi recipe that’s as enjoyable to make as it is to eat! I hope this recipe brings you as much joy as it does for me. So grab your ingredients, get in the kitchen, and let the delicious aromas carry you away to the Hawaiian shores. Happy baking!
PrintHawaiian Butter Mochi
A delightful dessert that features a chewy texture combined with rich coconut flavor, perfect for any occasion.
- Prep Time: 15 minutes
- Cook Time: 45 minutes
- Total Time: 60 minutes
- Yield: 12 servings 1x
- Category: Dessert
- Method: Baking
- Cuisine: Hawaiian
- Diet: Vegetarian
Ingredients
- 2 cups sweet rice flour (mochi flour)
- 1 cup granulated sugar
- 1 tablespoon baking powder
- 1 can coconut milk (13.5 oz)
- ½ cup unsalted butter, melted
- 4 large eggs
- 1 teaspoon vanilla extract
- 1 cup milk (add gradually until desired consistency)
Instructions
- Preheat the oven to 350°F (175°C).
- Prepare an 8×8 inch baking dish and grease it with butter or non-stick spray.
- Mix the dry ingredients: sweet rice flour, granulated sugar, and baking powder in a large bowl.
- Combine the wet ingredients: coconut milk, melted butter, eggs, and vanilla extract in a separate bowl.
- Add the wet mixture to the dry mixture, mixing gently, and gradually incorporate the milk until smooth.
- Pour the batter into the prepared dish and bake for about 45 minutes until golden brown.
- Cool the baked mochi in the pan for 15 minutes before slicing.
- Serve warm or at room temperature and enjoy!
Notes
Enhance coconut flavor with shredded coconut in the batter. Ensure the melted butter isn’t too hot when mixing with eggs.
Nutrition
- Serving Size: 1 serving
- Calories: 200
- Sugar: 10g
- Sodium: 150mg
- Fat: 8g
- Saturated Fat: 4g
- Unsaturated Fat: 3g
- Trans Fat: 0g
- Carbohydrates: 30g
- Fiber: 1g
- Protein: 3g
- Cholesterol: 80mg