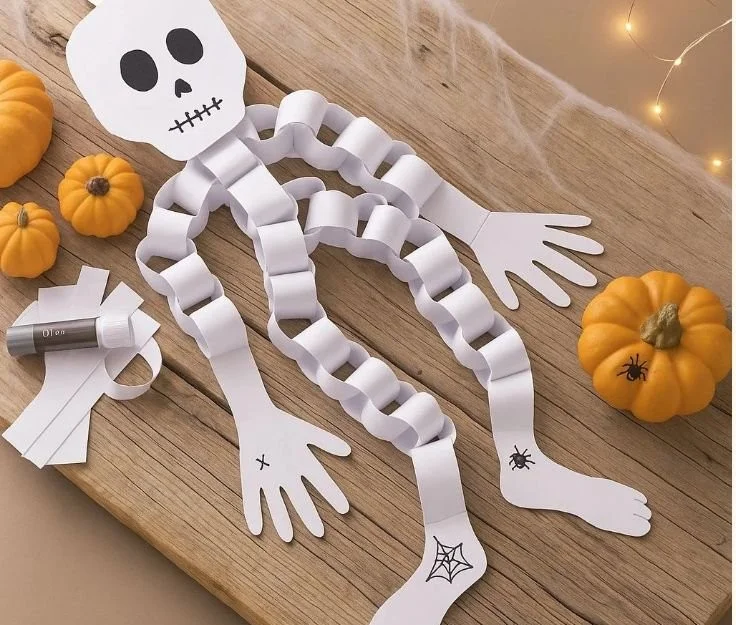
When the leaves start to turn shades of amber and gold, and that unmistakable chill fills the air, I know it’s time for one of my favorite seasonal festivities: Halloween! The excitement of dressing up, carving pumpkins, and creating a warm atmosphere brimming with spookiness fills my heart (and my home!). Among my many beloved traditions, crafting with family stands out, especially when it involves creating decorations that set the mood for hauntingly fun nights. One of our most cherished crafts is the Skeleton Paper Garland.
This simple yet charming project not only brings a dash of the macabre to our decor but also allows for those wonderful moments spent together, giggling and getting crafty. So, grab some scissors, colored paper, and your best Halloween spirit – because we’re going to create a spooktacular Skeleton Paper Garland that’ll be the talk of your Halloween soirée!
Recipe Timing
- Prep Duration: 30 minutes
- Active Cooking: N/A (craft project)
- Total Duration: 30 minutes
- Portion Size: 1 garland (length varies)
- Complexity: Simple
Nutritional Recipe
Since this is a fun crafting project rather than a culinary recipe, let’s consider it a treat for your creative spirit rather than a source of nutrition!
Why You’ll Love This Skeleton Paper Garland: Create a Spooky Halloween Craft!
This Skeleton Paper Garland is not just another decoration. It symbolizes the vibrant spirit of Halloween and brings a playful energy that transcends age. Whether you’re hosting a spooky gathering or simply looking to add a layer of fun to your home, this garland can elevate your Halloween décor while providing an excellent opportunity for creative bonding with your loved ones. Imagine sitting around the table, cutting and crafting skeletons, surrounded by laughter and the aroma of pumpkin spice in the air—these are the moments that make Halloween special.
The Complete Cooking Journey
Ready to dive into a world of craftiness? The joy of creating your skeleton garland starts here! Each step is straightforward, and I promise it’s an absolute joy to witness those spooky little skeletons come to life.
Ingredients:
- White cardstock or colored paper (black works wonderfully too!)
- Skeleton template (you can easily find free printables online)
- Scissors
- String or twine
- Tape or glue
- Optional: markers, stickers, or other embellishments to customize your garland!
Method:
Step 1: Gather Your Supplies
Lay out your white cardstock, scissors, string, and other embellishments. The more organized you are, the more fun we’ll have crafting!
Step 2: Print the Skeleton Template
Find a fun skeleton template online and print it onto your cardstock. Make sure the size fits your desired garland length!
Step 3: Cut Out the Skeletons
Take your scissors and carefully cut around the skeleton shapes. Let your creative mind wander—maybe add some spooky decorations to them while you cut!
Step 4: Punch Holes for Hanging
Once your skeletons are all cut out, use a hole punch (or scissors, if you’re feeling adventurous) to make holes at the top of each skeleton. This is where your twine will thread through!
Step 5: String the Skeletons Together
Cut a length of string or twine to your desired garland length, then string your skeletons along it. Be sure to space them evenly!
Step 6: Secure the Skeletons
Use tape or glue dots to secure the skeletons in place on the string. If you’re feeling particularly artsy, draw or doodle on them for a personalized touch!
Step 7: Hang Your Garland
Find the perfect spot to display your ghoulish creation—above a doorway, along a mantel, or across a wall!
Step 8: Admire Your Work!
Step back and soak in the frightfully delightful ambiance you’ve created. Cue the Halloween music—your garland is ready to welcome guests!
Serving Suggestions & Pairings
While this isn’t a dish you can serve on a plate, consider pairing your crafting day with a spooky-themed movie marathon or some pumpkin-flavored treats to elevate the festive spirit!
Storage & Leftovers Guide
If you plan to reuse your garland for future Halloweens, store it in a dry area, away from moisture. Simply fold it gently and keep it with your other seasonal decorations.
Kitchen Wisdom & Success Tips
- Use a heavyweight cardstock for sturdier skeletons that won’t crinkle!
- If your kids are helping, provide age-appropriate scissors or templates to make it easier for them to join in the fun.
- Don’t hesitate to use glitter or stickers for an extra flair!
Flavor Variations & Adaptations
Feel free to explore different themes! Instead of skeletons, try making bats, ghosts, or pumpkins for a completely unique garland each year.
Reader Questions & Solutions
-
Q: Can I use colored paper instead of white cardstock?
A: Absolutely! Black paper can create a haunting silhouette effect that’s perfect for Halloween. -
Q: My template isn’t printing well. What should I do?
A: Ensure you print at 100% size and check your printer settings for clarity. Also, consider resizing on your computer before printing! -
Q: Can I add lights to my garland?
A: Yes! Adding string lights can create an enchanting glow and elevate the mood of your Halloween décor. -
Q: How do I ensure my garland lasts for years?
A: Use acid-free materials and store it properly. Avoiding moisture is key! -
Q: What if I don’t have a printer for the template?
A: You can draw your own skeleton shapes freehand, or found images online and trace them!
Wrapping Up
Crafting the Skeleton Paper Garland is a delightful way to welcome the Halloween spirit into your home and create lasting memories with your loved ones. So gather those supplies, unleash your creativity, and have a blast making this fun decoration. It’s not just about the garland – it’s about the laughter shared and the spooky stories told while you work together. Enjoy this Halloween season, and don’t forget to scare up some fun! Happy crafting!
PrintSkeleton Paper Garland

A fun and creative project to make a spooky skeleton garland for Halloween celebrations.
- Prep Time: 30 minutes
- Cook Time: 0 minutes
- Total Time: 30 minutes
- Yield: 1 garland
- Category: Craft
- Method: Crafting
- Cuisine: N/A
- Diet: N/A
Ingredients
- White cardstock or colored paper
- Skeleton template
- Scissors
- String or twine
- Tape or glue
- Optional: markers, stickers, or other embellishments
Instructions
- Gather your supplies: Lay out your white cardstock, scissors, string, and other embellishments.
- Print the skeleton template: Find a fun skeleton template online and print it onto your cardstock.
- Cut out the skeletons: Carefully cut around the skeleton shapes.
- Punch holes for hanging: Make holes at the top of each skeleton for the twine.
- String the skeletons together: Cut a length of twine to your desired garland length and string your skeletons.
- Secure the skeletons: Use tape or glue dots to secure them on the string.
- Hang your garland: Display your ghoulish creation in your chosen spot.
- Admire your work: Step back and enjoy your festive decoration.
Notes
Use heavyweight cardstock for sturdier skeletons. Customize with glitter or stickers for extra flair.
Nutrition
- Serving Size: 1 garland
- Calories: 0
- Sugar: 0g
- Sodium: 0mg
- Fat: 0g
- Saturated Fat: 0g
- Unsaturated Fat: 0g
- Trans Fat: 0g
- Carbohydrates: 0g
- Fiber: 0g
- Protein: 0g
- Cholesterol: 0mg